For working professionals
For fresh graduates
- Study abroad
More
- Executive Doctor of Business Administration from SSBM
- Doctorate in Business Administration by Edgewood College
- Doctorate of Business Administration (DBA) from ESGCI, Paris
- Doctor of Business Administration From Golden Gate University
- Doctor of Business Administration from Rushford Business School, Switzerland
- Post Graduate Certificate in Data Science & AI (Executive)
- Gen AI Foundations Certificate Program from Microsoft
- Gen AI Mastery Certificate for Data Analysis
- Gen AI Mastery Certificate for Software Development
- Gen AI Mastery Certificate for Managerial Excellence
- Gen AI Mastery Certificate for Content Creation
- Post Graduate Certificate in Product Management from Duke CE
- Human Resource Analytics Course from IIM-K
- Directorship & Board Advisory Certification
- Gen AI Foundations Certificate Program from Microsoft
- CSM® Certification Training
- CSPO® Certification Training
- PMP® Certification Training
- SAFe® 6.0 Product Owner Product Manager (POPM) Certification
- Post Graduate Certificate in Product Management from Duke CE
- Professional Certificate Program in Cloud Computing and DevOps
- Python Programming Course
- Executive Post Graduate Programme in Software Dev. - Full Stack
- AWS Solutions Architect Training
- AWS Cloud Practitioner Essentials
- AWS Technical Essentials
- The U & AI GenAI Certificate Program from Microsoft
1. Introduction
6. PyTorch
9. AI Tutorial
10. Airflow Tutorial
11. Android Studio
12. Android Tutorial
13. Animation CSS
16. Apex Tutorial
17. App Tutorial
18. Appium Tutorial
21. Armstrong Number
22. ASP Full Form
23. AutoCAD Tutorial
27. Belady's Anomaly
30. Bipartite Graph
35. Button CSS
39. Cobol Tutorial
46. CSS Border
47. CSS Colors
48. CSS Flexbox
49. CSS Float
51. CSS Full Form
52. CSS Gradient
53. CSS Margin
54. CSS nth Child
55. CSS Syntax
56. CSS Tables
57. CSS Tricks
58. CSS Variables
61. Dart Tutorial
63. DCL
65. DES Algorithm
83. Dot Net Tutorial
86. ES6 Tutorial
91. Flutter Basics
92. Flutter Tutorial
95. Golang Tutorial
96. Graphql Tutorial
100. Hive Tutorial
103. Install Bootstrap
107. Install SASS
109. IPv 4 address
110. JCL Programming
111. JQ Tutorial
112. JSON Tutorial
113. JSP Tutorial
114. Junit Tutorial
115. Kadanes Algorithm
116. Kafka Tutorial
117. Knapsack Problem
118. Kth Smallest Element
119. Laravel Tutorial
122. Linear Gradient CSS
129. Memory Hierarchy
133. Mockito tutorial
134. Modem vs Router
135. Mulesoft Tutorial
136. Network Devices
138. Next JS Tutorial
139. Nginx Tutorial
141. Octal to Decimal
142. OLAP Operations
143. Opacity CSS
144. OSI Model
145. CSS Overflow
146. Padding in CSS
148. Perl scripting
149. Phases of Compiler
150. Placeholder CSS
153. Powershell Tutorial
158. Pyspark Tutorial
161. Quality of Service
162. R Language Tutorial
164. RabbitMQ Tutorial
165. Redis Tutorial
166. Redux in React
167. Regex Tutorial
170. Routing Protocols
171. Ruby On Rails
172. Ruby tutorial
173. Scala Tutorial
175. Shadow CSS
178. Snowflake Tutorial
179. Socket Programming
180. Solidity Tutorial
181. SonarQube in Java
182. Spark Tutorial
189. TCP 3 Way Handshake
190. TensorFlow Tutorial
191. Threaded Binary Tree
196. Types of Queue
197. TypeScript Tutorial
198. UDP Protocol
202. Verilog Tutorial
204. Void Pointer
205. Vue JS Tutorial
206. Weak Entity Set
207. What is Bandwidth?
208. What is Big Data
209. Checksum
211. What is Ethernet
214. What is ROM?
216. WPF Tutorial
217. Wireshark Tutorial
218. XML Tutorial
Graphql Tutorial
Introduction
GraphQL has emerged as a powerful query language for APIs in the fast-evolving web development world. It has revolutionized the way data is fetched and manipulated. This comprehensive GraphQL tutorial will take you on a journey to master this language. Starting from the basics and extending to advanced concepts, it covers all. Whether you're a developer exploring new technologies or someone seeking to enhance your web development skills, this GraphQL tutorial will equip you with the knowledge to harness the full potential of this query language.
Overview
GraphQL, developed by Facebook in 2012 and open-sourced in 2015, is a query language for APIs that enables clients to request only the data they need, simplifying data fetching and reducing over-fetching issues. Unlike traditional REST APIs, where multiple endpoints are required to retrieve specific data, GraphQL offers a single endpoint, making it more efficient and flexible.
History of GraphQL
GraphQL was initially conceived to overcome limitations in REST APIs. For example, consider a social media platform's API that provides a "User" endpoint to fetch user details and a separate "Posts" endpoint to retrieve posts. If you need to display a user's name and their recent posts on the same page, you will have to make two separate requests. This leads to inefficiencies, known as the "over-fetching" problem.
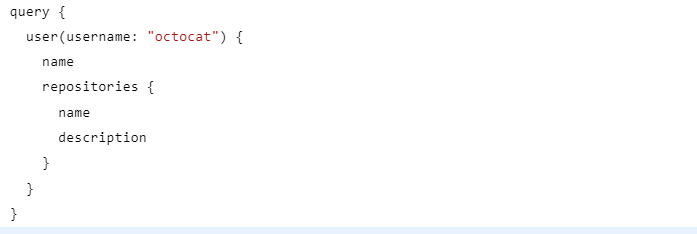
With GraphQL, you can request both user information and their recent posts in a single query, reducing the number of API calls and optimizing data retrieval. Here's an example using the GitHub API:
The output of this query depends on the actual data in the GraphQL server or API being queried. Without access to a specific GraphQL server, the exact output cannot be provided.
In general, if the server has a user with the username "octocat" and they have repositories associated with them, the expected output might look something like this:
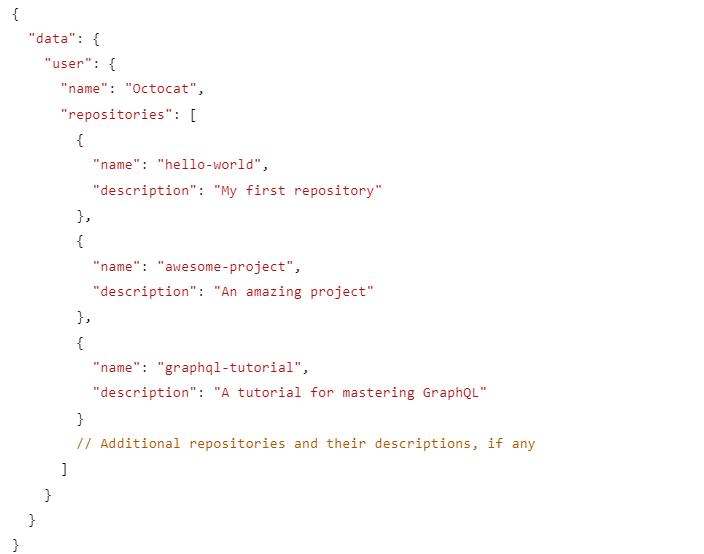
This query fetches the name of the user "octocat" along with the names and descriptions of their repositories, all in one go.
Operating System Compatibility
GraphQL is platform-agnostic, which means it can be used with various programming languages and frameworks. Let's explore how to set up a GraphQL server in popular tech stacks:
1. GraphQL in Java
GraphQL has gained immense popularity as a query language for APIs, offering efficient data fetching and flexible data querying. In this GraphQL in Java tutorial, we'll explore how to build a GraphQL API in Java using the graphql-java library.
Make sure you have Java JDK and an IDE (e.g., Eclipse, IntelliJ) installed on your machine.
Step 1: Set Up the Project
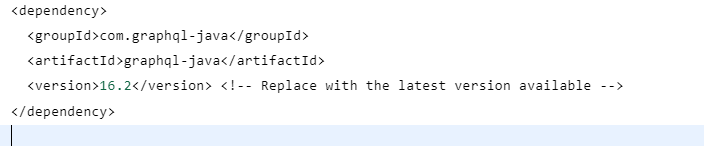
Start by creating a new Java project in your IDE. Next, add the graphql-java library to your project's dependencies. If you're using Maven, include the following dependency in your pom.xml:
For Gradle users, add this to your build.gradle:

Step 2: Define the GraphQL Schema
In GraphQL, define the schema that represents the types available in your API and their fields. Let's create a simple schema with a Query type containing a single field hello of type String.
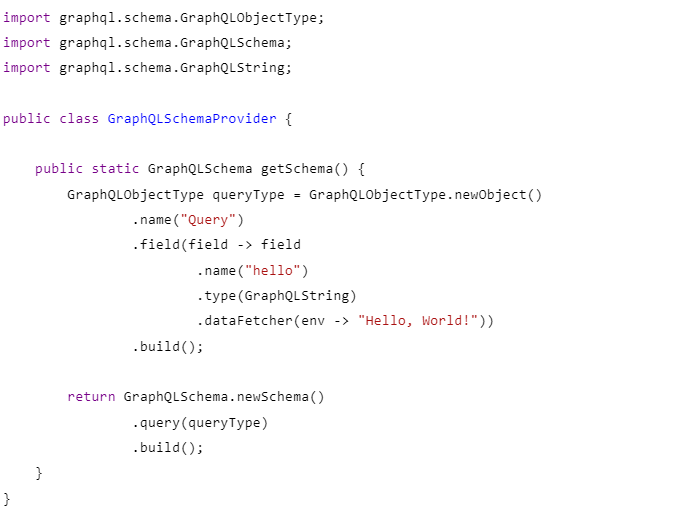
In the above code, we've defined a GraphQLObjectType representing the Query type with the hello field. The dataFetcher method sets the resolver function for the hello field, which simply returns the string "Hello, World!".
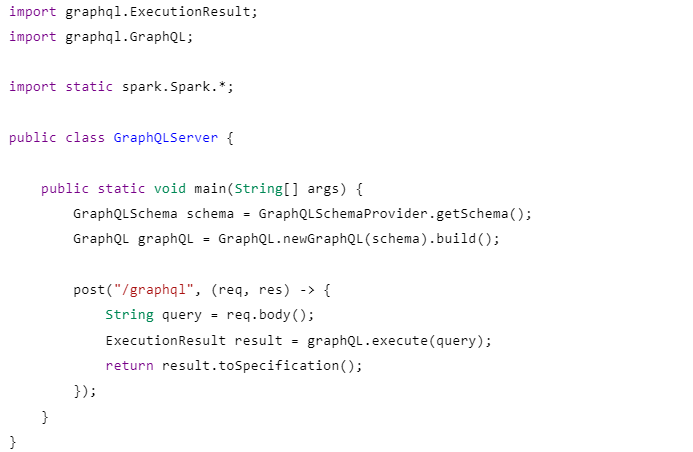
Step 3: Set Up the GraphQL Server
Next, we'll set up the GraphQL server using the graphql-java library.
Step 4: Test the GraphQL API
With the server set up, it's time to test our GraphQL API. You can use tools like Postman, Insomnia or command-line tools like curl to send GraphQL queries to the server.
For example, using curl, you can run the following command:
The server will respond with:

2. GraphQL in Node.js
GraphQL in Node.js is a powerful combination that allows developers to build efficient and flexible APIs. With GraphQL, you can easily define your data models, query the data you need, and receive well-structured responses. In this GraphQL in Node.js tutorial, we'll explore how to implement GraphQL in Node.js step-by-step.
Step 1: Set Up the Node.js Project
To install npm (Node Package Manager), you need to install Node.js, as npm comes bundled with it. Here are the steps to load npm:
- Download Node.js Installer
Go to the official Node.js website (https://nodejs.org/) and download the installer for your operating system. Node.js supports various operating systems, including Windows, macOS, and Linux.
- Run the Installer
After downloading the installer, run the executable file to start the installation process. Follow the on-screen instructions to proceed with the installation.
- Choose the Installation Location
During the installation, you might be prompted to choose the installation location. The default location is generally recommended, but you can customize it according to your preferences.
- Check the Installation
Once the installation is complete, you can check if Node.js and npm are installed properly. Open your command-line interface (Command Prompt on Windows or Terminal on macOS and Linux) and type the following commands:

These commands will display the installed versions of Node.js and npm, respectively. If you see version numbers, it means the installation is successful.
Step 2: Install Dependencies
Install the required dependencies for setting up the GraphQL server:
npm install express apollo-server-express graphql
Step 3: Create a GraphQL Schema
Define your GraphQL schema using the GraphQL schema language. It describes the types available in your API and the fields they have. For example, let's create a simple schema with a Query type that has a single field hello of type String:

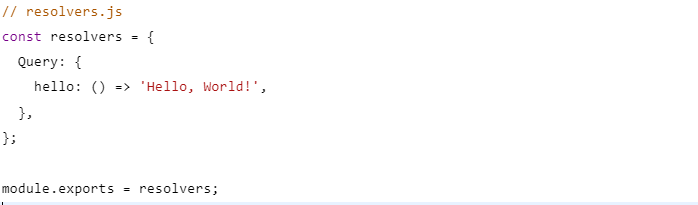
Step 4: Implement Resolvers
Resolvers are functions responsible for fetching the data for the defined fields in the schema. In this case, we'll create a resolver for the hello field that returns the string "Hello, World!".
Step 5: Set Up the Apollo Server with Express
Now, create the Apollo Server and integrate it with Express:
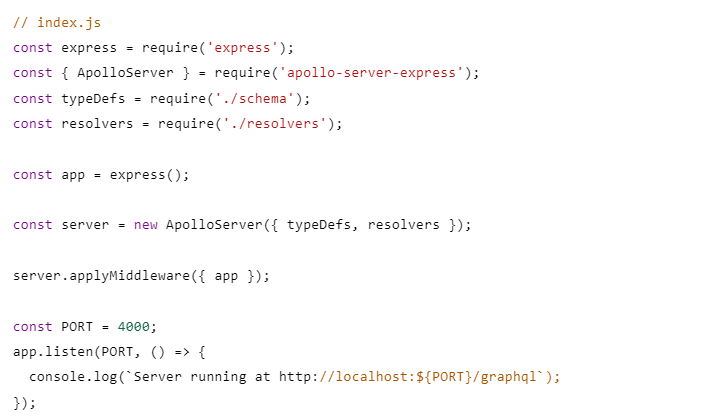
Step 6: Start the Server
Start your Node.js server by running the following command:
node index.js
Step 7: Test Your GraphQL API
Now your GraphQL server is up and running. Open your web browser or use a GraphQL client tool like GraphQL Playground or Altair to test your API.
In the GraphQL Playground, you can execute the following query:
query {
  hello
}
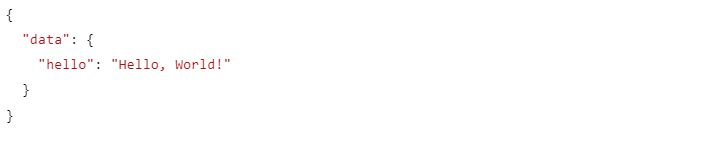
The server will respond with:
{
  "data": {
    "hello": "Hello, World!"
  }
}
3.GraphQL in Spring Boot
This short GraphQL in Spring Boot tutorial will teach you how to integrate GraphQL in Spring Boot using graphql-spring-boot-starter. Here's an example:
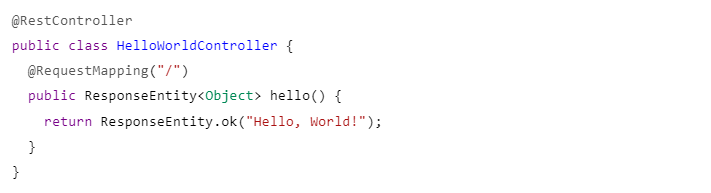
The method hello() returns a ResponseEntity<Object> containing the message "Hello, World!" wrapped in a ResponseEntity object. The ResponseEntity allows you to customize the HTTP response, including the status code, headers, and body.
Now, assume this controller is part of a Spring Boot application, and the application is running on a server. When you access the root URL of the application in a web browser or make a request to the root URL using a tool like curl, the output will be:
Hello, World!
This is because the hello() method returns the string "Hello, World!" in the response body, and the ResponseEntity.ok(...) method sets the HTTP status code to 200 (OK).
4. GraphQL in Angular
This GraphQL in Angular tutorial will discuss how libraries like apollo-angular can be utilized to use GraphQL with Angular. Here's a simple query:

`;
The actual output of the GET_HELLO_QUERY depends on the server's response when the query is executed, typically using a GraphQL client like apollo-client or graphql-request. Let's assume the server responds with the following JSON data:
In this case, the GET_HELLO_QUERY represents the following GraphQL query:

And the output of the query, when executed, will be:
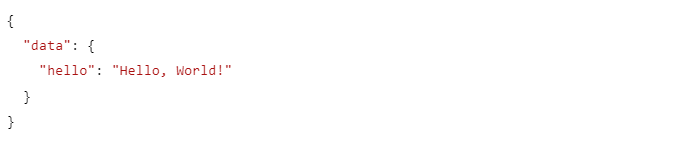
The provided query requests the value of the hello field, and the server responds with the corresponding data. The output is a JSON object containing the data field, which holds the value of the hello field.
5. GraphQL in React
This GraphQL in React tutorial will explain how React applications can benefit from GraphQL using react-apollo.
Here's an example:
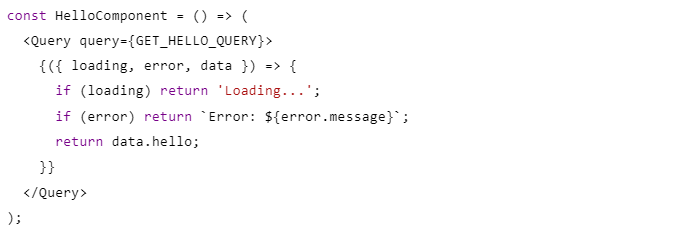
The output of the ‘HelloComponent’ depends on the data received from the GraphQL server in response to the ‘GET_HELLO_QUERY’. Let's assume that the GET_HELLO_QUERY is a valid GraphQL query that fetches a field named hello from the server.
The output will be different based on the state of the data-fetching process:
- If the data is still loading:
The component will return the string 'Loading...' to indicate that the data is being fetched.
- If there's an error while fetching the data:
The component will return an error message with the specific error from the GraphQL server, for example, 'Error: Failed to fetch data'.
- If the data is successfully fetched and contains the hello field:
The component will return the value of the hello field from the data object.
For example, let's say the server responds with the following JSON data:

In this case, the output of the HelloComponent will be:
Hello, World!
However, if there's an error, the output might be:
Error: Something went wrong while fetching data.
Remember that the actual output will depend on the response from the GraphQL server and the specific error message if a mistake occurs during data fetching. The provided code snippet shows how the component handles different scenarios during the data-fetching process using the loading, error, and data properties provided by the react-apollo library.
GraphQL: A Rapidly Growing Community
GraphQL's popularity has skyrocketed in recent years due to its numerous advantages. Developers appreciate the declarative approach to data fetching, which enhances code maintainability and readability. Additionally, the vibrant GraphQL community actively contributes to its ecosystem by developing tools and libraries, making GraphQL integration seamless with modern tech stacks.
Why Use GraphQL?
- Efficient Data Fetching: GraphQL allows clients to request exactly the data they need, avoiding over-fetching and under-fetching issues.
- Flexibility and Versioning: Clients can add new fields to queries without requiring server changes, making it easier to evolve APIs over time.
- Reduced Network Requests: With GraphQL, multiple API requests can be combined into a single query, minimizing network overhead.
- Strongly Typed: GraphQL's type system enables better error handling and validation during development.
- Introspection: GraphQL provides introspection, allowing clients to query the schema itself, making it easier to explore and understand APIs.
Conclusion
This GraphQL tutorial has covered the fundamentals of GraphQL, its historical context, and its versatility in various tech stacks. By adopting this query language, you'll enhance your web development workflow, deliver more efficient APIs, and join a thriving community that continues to shape the future of web development. Embrace GraphQL, and unleash the full potential of modern data-driven applications.
FAQs
1. How does GraphQL differ from REST APIs?
GraphQL and REST APIs are both used to create APIs for web applications, but they have fundamental differences in how they handle data fetching and flexibility. The latter typically have multiple endpoints, and clients receive fixed data structures from each endpoint. In contrast, the former has a single endpoint, and clients can specify exactly what data they need using queries. This flexibility eliminates over-fetching and under-fetching issues often encountered with REST APIs.
2. How can I handle authentication and authorization in GraphQL?
Handling authentication and authorization in GraphQL follows similar principles as REST APIs. You can implement verification mechanisms like OAuth, JWT, or session-based authentication to validate user identity. Once authenticated, you can use custom resolvers to enforce authorization rules on specific fields or types.
3. How can I optimize GraphQL queries for performance?
GraphQL queries can be highly efficient if optimized properly. To enhance performance, you can employ techniques such as batching multiple queries into a single request, enabling persisted queries (query deduplication), and utilizing DataLoader for efficient data loading and caching. Moreover, implementing a well-designed schema with the appropriate use of pagination and query depth control helps to prevent excessive data fetching and costly resolver operations.

Author|900 articles published


upGrad Learner Support
Talk to our experts. We are available 7 days a week, 9 AM to 12 AM (midnight)
Indian Nationals
1800 210 2020
Foreign Nationals
+918068792934
Disclaimer
1.The above statistics depend on various factors and individual results may vary. Past performance is no guarantee of future results.
2.The student assumes full responsibility for all expenses associated with visas, travel, & related costs. upGrad does not provide any a.


