Whether you're just starting to learn programming or working on performance-critical applications, C is one of the most fundamental languages to know. To write and run C code on a Mac, the first tool you’ll need is a C Compiler for Mac. Fortunately, macOS—being Unix-based—makes it relatively straightforward to get started. From built-in compilers to third-party tools, there’s no shortage of options when it comes to setting up a solid C development environment.
A good C Compiler for Mac does more than just translate your code into machine language. It also influences performance, compatibility, and the overall development experience. Depending on whether you're working on system-level code, learning in a classroom, or contributing to open-source projects, your choice of compiler could vary. That’s why top software development courses include tutorials on C Compiler for Mac can save you hours of frustration and debugging.
In this guide, we’ll explore all your options—from Apple’s Clang compiler and the full XCode IDE, to GCC via Homebrew and other alternative compilers. You’ll also learn how to install each one, write and compile your first program, and get familiar with the tools that help streamline C development on macOS. Whether you're looking for the simplest setup or the most powerful, we’ve got the right C Compiler for Mac for you.
Elevate your skills and curate a future-proof career with following courses:
Installing a C Compiler for Mac
Before you can compile your first line of C code, you’ll need a proper development setup—and that starts with installing a C Compiler for Mac. The good news? macOS makes it easy to get started, and you’ve got two reliable, well-supported options: Clang (which comes bundled with Apple’s XCode Command Line Tools), and GCC (which you can install through Homebrew). Both are widely used in the industry, and each has its own strengths depending on your development goals.
If you're just starting out or want the simplest setup possible, Clang is likely your best bet. It integrates natively with macOS, it's lightweight, and it's officially supported by Apple. But if you’re aiming for broader compatibility, especially with Linux environments or open-source projects, you might prefer installing GCC. Let’s walk through how to set up both options so you can pick the right C Compiler for Mac for your workflow.
Additionally, if you also use Linux OS, then you must explore our article on compiling C programs on Linux systems.
Installing Clang via XCode Command Line Tools
Clang is Apple’s default C Compiler for Mac, and it’s a part of the XCode Command Line Tools package. The great part about using Clang is that it comes directly from Apple, works seamlessly with macOS libraries, and is compliant with most modern C standards. Even better, it’s very easy to install.
How to Install Clang:
1. Open the Terminal (you can find it using Spotlight or in Applications > Utilities).
2. Run the following command to trigger the installation of XCode Command Line Tools:
xcode-select --install
3. A dialog box will pop up asking if you want to install the tools. Click Install, then wait a few minutes while macOS downloads and sets everything up.
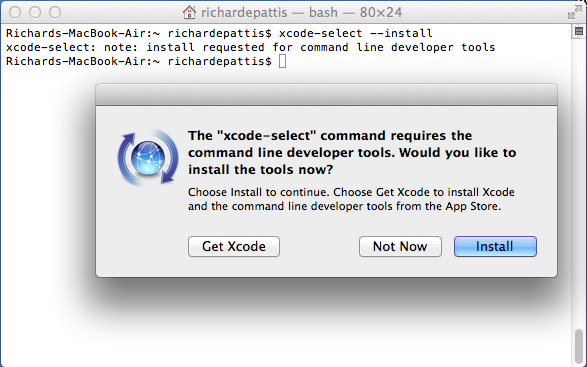
4. Once the installation finishes, confirm that Clang was installed correctly by running:
clang --version
You should see output showing the installed Clang version, something like:
Apple clang version 15.0.0 (clang-1500.0.40.1)
Target: arm64-apple-darwin23.2.0
That’s it—you now have a fully functional C Compiler for Mac, and you’re ready to start writing and compiling C code.
Installing GCC via Homebrew
While Clang is the default on macOS, GCC is often used for projects that require GNU-specific features or when targeting environments like Linux. It’s particularly useful if you're contributing to open-source projects that use `Makefiles` or rely on strict GNU C compliance.
To install GCC, you’ll need Homebrew, the de facto package manager for macOS.
Step 1: Install Homebrew (if it’s not already installed)
In your Terminal, run:
/bin/bash -c "$(curl -fsSL https://raw.githubusercontent.com/Homebrew/install/HEAD/install.sh)"
Follow the on-screen instructions. Once installation is complete, check it worked by running:
brew --version
Step 2: Install GCC using Homebrew
Now that you’ve got Homebrew installed, getting GCC is simple:
brew install gcc
Homebrew installs the latest version of GCC, but it will be named something like `gcc-13`, `gcc-14`, etc., depending on the current version.
To verify:
gcc-13 --version
You’ll see something like:
gcc-13 (Homebrew GCC 13.2.0_1) 13.2.0
Target: aarch64-apple-darwin23
Optional: Make GCC Your Default C Compiler for Mac
If you want to use GCC as your default C Compiler for Mac, you can create a shell alias. Add this to your `.zshrc` (or `.bash_profile` if you're using bash):
alias gcc="gcc-13"
alias cc="gcc-13"
Then apply the change:
source ~/.zshrc
Now, when you type `gcc` in Terminal, it will use the version installed by Homebrew.
Other C Compilers for Mac
While Clang and GCC are the primary go-to compilers for macOS, there are several other C Compilers for Mac that can be valuable depending on your specific use case. Whether you’re developing for embedded systems, looking to optimize performance, or need a lightweight and fast compiler, these alternatives can offer significant benefits. Let’s take a look at some of these lesser-known but powerful compilers that might be a better fit for specialized projects.
Furthermore, the compilation becomes easy, when the structure is correct. So, you should go through our detailed article on structure of a C program.
Tiny C Compiler for Mac (TCC)
Tiny C Compiler (TCC) is a minimalist compiler designed for maximum speed and efficiency. Unlike other compilers, TCC focuses heavily on extremely fast compilation times, even at the expense of certain optimizations. It’s not as feature-rich as GCC or Clang, but it’s incredibly useful when you need to compile small programs or scripts quickly.
Key Features:
- Lightning-fast compilation: TCC can compile code nearly instantaneously, which is great for small projects or learning environments.
- Minimalistic design: The focus of TCC is on simplicity and speed. It has fewer features compared to GCC or Clang, but it’s more than enough for many small tasks.
- No dependency: It doesn’t require external libraries or complex setup, making it an excellent choice for quick experiments or educational purposes.
- Portability: TCC is designed to work on multiple platforms, and it can also generate executables for different operating systems.
Installation via Homebrew:
1. First, ensure that you have Homebrew installed. If not, run the following command in your terminal:
/bin/bash -c "$(curl -fsSL https://raw.githubusercontent.com/Homebrew/install/HEAD/install.sh)"
2. Install TCC with Homebrew by running:
brew install tcc
3. After installation, verify the installation by running:
tcc --version
When to Use:
- Learning C: TCC is a great tool if you're just starting out with C, as it provides a no-frills experience without too much complexity.
- Prototyping: When you need to quickly test or prototype small programs, TCC is an excellent choice because of its fast compilation time.
- Lightweight scripts: TCC is ideal for situations where performance is less of a concern, but speed in compilation is critical.
Intel C Compiler for Mac (ICC / ICX)
The Intel C Compiler (ICC, and its successor ICX as part of the Intel oneAPI toolkit) is a high-performance compiler designed for software that needs to be optimized specifically for Intel processors. It’s particularly beneficial when working on applications that require maximum performance, such as scientific computing, data processing, or machine learning. Intel’s ICC is known for its advanced optimizations that can significantly improve execution speed.
Key Features:
- Optimized for Intel processors: ICC provides a range of optimizations that are specifically designed to make the most of Intel’s hardware, including vectorization, pipelining, and SIMD (Single Instruction, Multiple Data) instructions.
- Superior performance: ICC can outperform GCC and Clang when compiling code for Intel chips, particularly for tasks involving large data sets or complex mathematical computations.
- Multithreading and parallelism: The compiler provides advanced tools for multi-core parallelism, making it ideal for applications that need to run on modern Intel processors.
Installation:
To get ICC, you need to install Intel’s oneAPI toolkit, which includes the compiler as part of a broader suite of tools for high-performance computing.
1. Visit the Intel Developer Zone and download the Intel oneAPI toolkit.
2. Follow the installation steps provided by Intel. The toolkit includes detailed instructions for setting up the compiler on macOS.
3. Once installed, you can verify the installation by running:
icc --version
When to Use:
- Performance-critical applications: If you need to write high-performance code and are working with Intel hardware, ICC can squeeze out more performance than Clang or GCC.
- Scientific computing: For applications that need to perform complex mathematical or statistical calculations, ICC provides optimizations that can drastically reduce execution times.
- Parallel programming: If your program benefits from parallel computing (e.g., machine learning algorithms), ICC’s optimizations can enhance multi-threading performance.
Portable C Compiler for Mac (PCC)
Portable C Compiler (PCC) is one of the oldest C compilers and has been around for decades. It was originally designed for portability, allowing C code to be compiled across different UNIX-like systems. While it’s no longer as commonly used today, it’s still useful in certain environments, especially when working with legacy systems or needing to run code on uncommon platforms.
Key Features:
- Portability: The main feature of PCC is its ability to run on a wide range of different UNIX-like systems, making it useful for cross-platform development.
- Lightweight: PCC’s minimalistic approach means it doesn’t have as many features as GCC or Clang, but it’s great for environments where simplicity and portability are key.
- Historical significance: While modern compilers have largely replaced it, PCC still holds a place in the history of C development and is used in some specialized environments.
Installation:
1. First, install Homebrew if it’s not already installed:
/bin/bash -c "$(curl -fsSL https://raw.githubusercontent.com/Homebrew/install/HEAD/install.sh)"
2. Then, install PCC:
brew install pcc
3. You can verify installation by running:
pcc --version
When to Use:
- Legacy systems: If you’re maintaining or updating software that was originally written for older systems, PCC can still be useful for portability.
- Cross-platform development: PCC can help ensure your code will run on a variety of platforms, particularly those with older or non-standard compilers.
- Educational purposes: In an academic setting, PCC can be used to demonstrate how C compilers have evolved over time.
Small Device C Compiler for Mac (SDCC)
Small Device C Compiler (SDCC) is tailored specifically for embedded systems and microcontroller programming. If you're developing software for devices with limited resources (like 8-bit or 16-bit microcontrollers), SDCC is an excellent choice. It generates highly optimized, compact code suitable for these constrained environments.
Key Features:
- Targeted for embedded systems: SDCC supports various microcontroller architectures, such as 8051, Z80, PIC, and others.
- Compact code generation: The compiler is optimized to produce small code, making it ideal for microcontrollers with limited memory and processing power.
- Supports multiple platforms: SDCC works on many different microcontroller families, which makes it versatile for embedded systems developers.
Installation via Homebrew:
1. First, install Homebrew (if not already installed):
/bin/bash -c "$(curl -fsSL https://raw.githubusercontent.com/Homebrew/install/HEAD/install.sh)"
2. Install SDCC:
brew install sdcc
3. Check the version with:
sdcc --version
When to Use:
- Embedded systems: If you’re writing software for small microcontrollers (e.g., 8051, PIC, or Z80), SDCC is the go-to compiler for this kind of work.
- Resource-constrained environments: When working with limited resources (memory, storage), SDCC’s ability to generate compact code is invaluable.
- Microcontroller development: Perfect for projects where you need to program microcontrollers with specific, low-level control over hardware.
Writing and Running Your First C Program
Now that you have your C Compiler for Mac installed, it’s time to dive into writing and running your very first C program. Whether you’re using Clang, GCC, or any of the alternative compilers we’ve discussed, the process of compiling and executing C code on macOS is pretty straightforward. Let’s walk through the steps from writing a basic C program to compiling and running it on your machine.
Before you write your first C program, it’s recommended to understand the foundational concepts, such as:
Writing Your First C Program
Let’s start with a simple “Hello, World!” program, which is often the first program every C programmer writes. It’s a great way to get a feel for how C compilers work and verify that your environment is set up correctly.
1. Open your Text Editor of choice. You can use TextEdit (set to plain text mode), VS Code, Sublime Text, or XCode.
2. Write the following code in your text editor:
#include <stdio.h>

int main() {
    printf("Hello, World!\n");
    return 0;
}
This program is quite simple:
- `#include <stdio.h>` includes the standard I/O library for input and output functions.
- `int main()` defines the main function, where execution starts.
- `printf("Hello, World!\n");` prints the message to the terminal.
- `return 0;` signals the end of the program and returns a success status.
3. Save the file with a `.c` extension. For example, save it as `hello_world.c` in a folder on your desktop or another directory.
Compiling Your C Program
Now that you’ve written your first C program, it’s time to compile it using your C Compiler for Mac.
Using Clang:
1. Open Terminal and navigate to the directory where you saved your `hello_world.c` file. Use the `cd` (change directory) command:
cd /path/to/your/file
(Replace `/path/to/your/file` with the actual path to where the `.c` file is saved.)
2. To compile the program, use the following Clang command:
clang hello_world.c -o hello_world
This command tells Clang to compile `hello_world.c` and create an executable called `hello_world`.
3. After running the command, you should see no output if the program compiled successfully. To confirm, type:
ls
You should see the `hello_world` executable listed.
Using GCC (if you installed it via Homebrew):
1. In Terminal, navigate to the directory where your `hello_world.c` file is located.
2. Run the following GCC command:
gcc hello_world.c -o hello_world
Just like with Clang, this will compile your C program into an executable named `hello_world`.
3. You can verify the compiled file by running:
ls
You should see the `hello_world` executable in the same directory.
Running Your C Program
Once the program is compiled, it’s time to run it!
Running the Executable:
1. In Terminal, use the `./` command to run the program. This tells the terminal to execute the `hello_world` binary in the current directory:
./hello_world
2. You should see the output:
Hello, World!
This confirms that your C compiler worked properly and that your program compiled and executed as expected!
Debugging Your C Program (Optional)
If you encounter any issues or errors during compilation or execution, don’t worry—debugging is a normal part of programming. Here are a few common scenarios and troubleshooting tips:
Syntax Errors: If there’s a syntax mistake in your code (e.g., missing semicolons, parentheses), the compiler will show an error message with the line number. Go back to your code and fix the error based on the message. For more detailed understanding, you should explore the types of errors in C.
Compilation Errors: If you receive a message saying something like “`command not found`” or “`no such file`”, double-check the file path to make sure you’re in the correct directory. Use the `ls` command to ensure the `.c` file is in the right place.
Missing Clang or GCC: If you’re using Clang or GCC and get an error saying the compiler isn’t found, ensure that the compiler was installed properly and is included in your system’s `$PATH`. Try running:
clang --version
or
gcc --version
If they aren’t installed, follow the installation steps from earlier in this guide.
What’s Next? Expanding Your C Knowledge
Congratulations on writing and running your first C program! You’ve taken the first step toward becoming a proficient C developer. From here, you can expand your knowledge by:
- Learning about variables and data types in C, which will allow you to store and manipulate data.
- Exploring control structures like loops and conditionals to build more complex programs.
- Diving into functions for creating reusable code blocks and breaking your program into logical sections.
- Mastering pointers, one of C’s most powerful yet challenging features, which will allow you to work with memory directly.
Additionally, consider experimenting with more complex projects and exploring C libraries and frameworks that extend the language’s functionality.
Conclusion
In conclusion, using the right C compiler for Mac is crucial for ensuring efficient and successful development on macOS. With Clang as the default, it offers seamless integration with macOS, optimizing both the development experience and the performance of C programs. By mastering compiler flags for optimization, leveraging debugging tools like LLDB and GDB, and managing memory effectively, you can ensure that your C programs run efficiently and are free from bugs.
Whether you're working on small projects or large-scale applications, understanding the tools and processes involved in compiling, debugging, and optimizing your code will elevate your development skills. With the wide range of available compilers and debugging tools for macOS, you're equipped with everything you need to write robust, performant C code. Embracing these tools will not only enhance your current workflow but also help you become a more effective C developer on macOS.
FAQs
1. What is the best C compiler for Mac?
The best C compiler for Mac is Clang, which is the default compiler that comes with macOS. It’s highly optimized, integrates well with the system, and provides fast compilation and clear error messages. Clang also works seamlessly with XCode, making it the preferred choice for most C developers on macOS.
2. How do I install a C compiler on Mac?
To install a C compiler on Mac, you can use XCode’s Command Line Tools. Open the Terminal and run `XCode-select --install`. This will install Clang, the default C compiler. Alternatively, you can use Homebrew to install GCC or other compilers by running `brew install gcc` for more flexibility in your development environment.
3. Can I use GCC on Mac for C programming?
Yes, GCC (GNU Compiler Collection) can be used for C programming on macOS. While Clang is the default, you can install GCC using Homebrew by running `brew install gcc`. It provides different optimizations and compatibility with GCC-based projects, making it a good choice if you need cross-platform compatibility or require specific GCC features.
4. How do I set up XCode for C programming?
To set up XCode for C programming, first install XCode from the Mac App Store. Then, install the Command Line Tools by running `XCode-select --install` in the Terminal. You can start a new C project in XCode, where the Clang compiler will automatically be used to compile your C code. XCode provides a complete IDE for debugging and running C programs.
5. What is the difference between Clang and GCC?
Clang and GCC are both C compilers, but Clang is the default compiler on macOS, while GCC is widely used across multiple platforms. Clang generally provides better error messages, faster compilation times, and superior integration with macOS tools like XCode. GCC, on the other hand, offers compatibility with a broader range of systems and features a more mature codebase.
6. Can I use Visual Studio Code to write C on Mac?
Yes, Visual Studio Code (VS Code) is a popular editor for C programming on Mac. It’s lightweight, customizable, and supports C through extensions. After installing VS Code, you need to install a C compiler like Clang or GCC. You can also add extensions for debugging and code completion, turning it into an efficient C programming environment.
7. What is the role of LLDB in C programming?
LLDB is the default debugger for macOS and is used in C programming to inspect, debug, and analyze C code. It is integrated into XCode and supports features like breakpoints, variable inspection, and step-through debugging. LLDB is essential for identifying and fixing bugs in your C code, offering a detailed view of memory and program flow.
8. Can I use Sublime Text for C development on Mac?
Yes, Sublime Text is a fast and efficient text editor that can be used for C development on Mac. While it doesn’t come with a built-in compiler, you can easily configure it to work with Clang or GCC. You’ll need to install the right packages for syntax highlighting and integrate your compiler to compile and run C programs.
9. How do I debug C programs on Mac?
To debug C programs on Mac, you can use LLDB, which is integrated into XCode. Alternatively, you can use GDB if you prefer. Both debuggers allow you to set breakpoints, step through code, inspect variables, and find logical errors. Debugging is an essential step in the development process to ensure that your C programs run smoothly.
10. What are the advantages of using XCode for C programming?
XCode is an excellent choice for C programming on Mac because it provides an all-in-one development environment with tools for writing, compiling, and debugging C code. It uses Clang as the default compiler and integrates with LLDB for debugging. XCode also offers an intuitive user interface, making it easier to manage projects and track changes over time.
11. Is there any other C compiler available for Mac?
Yes, besides Clang, there are several other C compilers available for macOS, including GCC, TinyCC, and Intel’s C++ Compiler. Each offers different features and optimizations, such as compatibility with other operating systems or performance enhancements. You can install these compilers using Homebrew or other package managers, depending on your specific project requirements.
Take a Free C Programming Quiz
Answer quick questions and assess your C programming knowledge


-d9bdeff6165f4eb1ba2adcebde78e961.svg)


-ae8d039bbd2a41318308f8d26b52ac8f.svg)
-35c169da468a4cc481c6a8505a74826d.webp&w=128&q=75)
-7f4b4f34e09d42bfa73b58f4a230cffa.webp&w=128&q=75)


-9cd0a42cab014b9e8d6d4c4ba3f27ab1.webp&w=3840&q=75)