Build a Calculator in JavaScript Using HTML and CSS in 2026
By Rohan Vats
Updated on Jun 25, 2026 | 13 min read | 30.64K+ views
Share:

All courses
Certifications
More
By Rohan Vats
Updated on Jun 25, 2026 | 13 min read | 30.64K+ views
Share:
Table of Contents
Building a calculator in JavaScript using HTML and CSS is one of the best beginner projects for learning web development. It helps you understand HTML structure, CSS styling, JavaScript functions, DOM manipulation, event handling, and user input processing while creating a practical application from scratch.
This step-by-step guide shows you how to build a responsive calculator using HTML, CSS, and JavaScript. You'll learn the project structure, write the complete code, understand how each part works, and explore ways to improve the calculator with additional features.
Transform your career with upGrad’s Data Science Course. Learn from industry experts, work on hands-on projects, and gain the skills top employer’s demand.
Popular upGrad Programs
Before you build a calculator in JavaScript using HTML and CSS, make sure you're familiar with a few basic web development concepts. You don't need advanced programming knowledge, but understanding the topics below will make the project much easier to follow.
| Skill | Why You Need It |
|---|---|
| HTML Basics | Create the calculator layout, buttons, and display |
| CSS Fundamentals | Style the calculator and make it responsive |
| JavaScript Basics | Add logic and interactivity |
| Variables | Store numbers and user input |
| Functions | Perform calculations and organize code |
| DOM Manipulation | Access and update HTML elements |
| Event Listeners | Detect button clicks and keyboard input |
| Arithmetic Operators | Perform addition, subtraction, multiplication, and division |
| Basic Debugging | Find and fix common coding errors |
| Code Editor | Use tools like VS Code to write and run your project |
Free Courses
Before directly going to code in HTML, CSS, and Java, let’s plan, how to build a calculator. It helps define the features, layout, and user experience, ensuring the project is organized and functional. Let’s break down the planning process into two key areas: features and functionality and wireframing and layout design.
The first step in planning the calculator is deciding on the core features. Here are the primary functionalities we need to implement for a calculator in JavaScript:
These features will give us a fully functional calculator that meets the needs of most users. Once the features are defined, it’s important to design how the calculator will look and how users will interact with it.
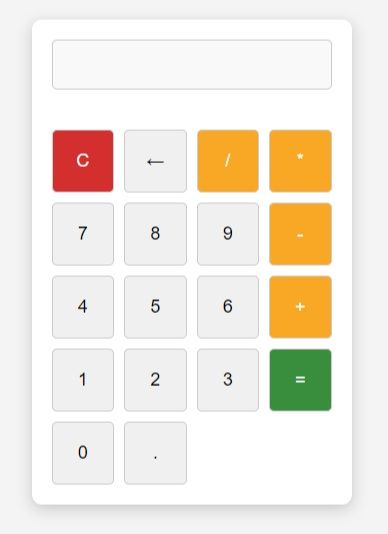
Wireframing involves planning the arrangement of elements like buttons and the display screen. The layout of the calculator should be intuitive and easy to use. Typically, the number buttons (0–9) are placed in a grid, with operators and special buttons like C (clear), ← (backspace), and = (equals) positioned logically for ease of use.
The display should be large enough to show input clearly and should sit at the top for easy visibility. Additionally, the layout should be responsive, ensuring the calculator works well on all screen sizes, especially mobile devices.
Recommended Courses to upskill
Explore Our Popular Courses for Career Progression
IIIT Bangalore
Executive Diploma in Machine Learning and AI360° Career Support
O.P.Jindal Global University
MBA from O.P.Jindal Global UniversityLive Case Studies and Projects
To begin building a calculator in JavaScript, we need to set up the project structure. This will help keep everything organized and ensure that all components of our calculator function properly together.
Check out Java Free Online Course
Here’s how to structure your project and link the necessary files.
For a clean and manageable project, use the following folder structure:
/calculator
  ├── index.html
  ├── styles.css
└── script.jsBy organizing the project in this way, we ensure that the calculator using HTML, CSS, and JavaScript is easy to maintain and expand upon in the future.
Now that we have our folder structure in place, we need to link the HTML, CSS, and JavaScript files together to make the calculator work. Here’s how to do it:
1. Linking the CSS File in HTML: In your index.html file, link the styles.css file in the <head> section:
<link rel="stylesheet" href="styles.css">2. Linking the JavaScript File: In the <body> section of index.html, add a script tag to link the script.js file:
<script src="script.js"></script>This ensures that your JavaScript calculator will be loaded and executed after the HTML structure is ready.
Build a strong foundation in data science while strengthening your programming and problem-solving skills through these industry-focused upGrad programs.
Here’s how the basic HTML file should look with both the CSS and JavaScript files linked:
<!DOCTYPE html>
<html lang="en">
<head>
  <meta charset="UTF-8">
  <meta name="viewport" content="width=device-width, initial-scale=1.0">
  <title>Calculator</title>
  <link rel="stylesheet" href="styles.css">
</head>
<body>
  <!-- Calculator layout goes here -->
  <script src="script.js"></script>
</body>
</html>
With the HTML, CSS, and JavaScript files properly linked, you're now ready to start building the actual calculator in JavaScript. This organization ensures that the components interact seamlessly to deliver a smooth user experience.
Learn how to build a calculator using Python
The first step in building our calculator is to create the HTML structure. HTML provides the skeleton of the calculator, which includes the display for showing results and buttons for user interaction. We'll define the layout and structure of the calculator elements.
Here’s the boilerplate code for the HTML document:
<!DOCTYPE html>
<html lang="en">
  <head>
    <meta charset="UTF-8" />
    <meta name="viewport" content="width=device-width, initial-scale=1.0" />
    <title>Calculator - By Upgrad</title>
    <!-- Link to external CSS file for styling -->
    <link rel="stylesheet" href="style.css" />
  </head>
  <body>
    <!-- Main container for the calculator -->
    <div class="calculator-container">
      <!-- Display area where numbers and results are shown -->
      <input type="text" id="display" class="display" disabled />

      <!-- Buttons for the calculator -->
      <div class="buttons">
        <button class="btn clear" id="clear">C</button>
        <button class="btn backspace" id="backspace">←</button>
        <button class="btn operator" id="divide">/</button>
        <button class="btn operator" id="multiply">*</button>

        <button class="btn" id="7">7</button>
        <button class="btn" id="8">8</button>
        <button class="btn" id="9">9</button>
        <button class="btn operator" id="subtract">-</button>

        <button class="btn" id="4">4</button>
        <button class="btn" id="5">5</button>
        <button class="btn" id="6">6</button>
        <button class="btn operator" id="add">+</button>

        <button class="btn" id="1">1</button>
        <button class="btn" id="2">2</button>
        <button class="btn" id="3">3</button>
        <button class="btn equals" id="equals">=</button>

        <button class="btn" id="0">0</button>
        <button class="btn" id="decimal">.</button>
      </div>
    </div>

    <!-- Link to external JavaScript file for functionality -->
    <script src="script.js"></script>
  </body>
</html>
Source: Calculator html
Explanation of HTML:
Now, let's add CSS to style our calculator. We'll define the general layout, button styles, and the look of the display. The goal is to make the calculator visually appealing and easy to use.
/* Resetting default margin and padding for a clean slate */
* {
  margin: 0;
  padding: 0;
  box-sizing: border-box;
}

/* Body and overall page styling */
body {
   /* Font for the whole body */
  background-color: #f4f4f4; /* Light gray background for the page */
  display: flex;
  justify-content: center;
  align-items: center;
  height: 100vh; /* Full viewport height */
  margin: 0;
}

/* Container styling for the calculator */
.calculator-container {
  width: 320px; /* Fixed width for the calculator */
  background-color: #fff; /* White background for the calculator */
  border-radius: 10px; /* Rounded corners for a modern look */
  box-shadow: 0 4px 15px rgba(0, 0, 0, 0.2); /* Soft shadow effect */
  padding: 20px;
  display: flex;
  flex-direction: column;
  align-items: center;
  gap: 20px; /* Space between elements */
}

/* Display area styling */
.display {
  width: 100%; /* Full width of the container */
  height: 50px; /* Set height of the display area */
  font-size: 24px; /* Font size for numbers */
  text-align: right; /* Right-align the text in the display */
  padding: 10px;
  background-color: #f9f9f9; /* Light background for the display */
  border: 1px solid #ccc; /* Border around the display */
  border-radius: 5px; /* Rounded corners for the display */
  margin-bottom: 20px; /* Space below the display */
  color: #333; /* Dark text color */
}

/* Button layout in a grid (4 columns for calculator layout) */
.buttons {
  display: grid;
  grid-template-columns: repeat(4, 1fr); /* 4 equal-width columns */
  grid-gap: 10px; /* Gap between buttons */
  width: 100%;
}

/* General button styling */
.btn {
  background-color: #f0f0f0; /* Light gray background */
  border: 1px solid #ccc; /* Border around each button */
  border-radius: 5px; /* Rounded corners for buttons */
  font-size: 18px; /* Font size for button text */
  padding: 20px; /* Padding inside the buttons */
  text-align: center; /* Center-align the text inside buttons */
  cursor: pointer; /* Pointer cursor on hover */
  transition: background-color 0.3s ease; /* Smooth transition for hover effect */
}

/* Hover effect for buttons */
.btn:hover {
  background-color: #ddd; /* Darker gray on hover */
}

/* Active state for buttons (when clicked) */
.btn:active {
  background-color: #bbb; /* Even darker on click */
}

/* Styling for operator buttons (addition, subtraction, etc.) */
.btn.operator {
  background-color: #f9a825; /* Yellow background for operators */
  color: white; /* White text */
}

.btn.operator:hover {
  background-color: #f57f17; /* Darker yellow on hover */
}

.btn.operator:active {
  background-color: #ff6f00; /* Even darker on click */
}

/* Styling for the 'C' (Clear) and 'Backspace' buttons */
.btn.clear {
  background-color: #d32f2f; /* Red background for clear */
  color: white; /* White text */
}

.btn.clear:hover {
  background-color: #c62828; /* Darker red on hover */
}

.btn.clear:active {
  background-color: #b71c1c; /* Even darker red on click */
}

/* Styling for the 'Equals' button */
.btn.equals {
  background-color: #388e3c; /* Green background for equals */
  color: white; /* White text */
}

.btn.equals:hover {
  background-color: #2c6b2f; /* Darker green on hover */
}

.btn.equals:active {
  background-color: #1b5e20; /* Even darker green on click */
}
Source: Calculator CSS
Explanation of CSS:
Subscribe to upGrad's Newsletter
Join thousands of learners who receive useful tips
Now, we will add JavaScript to bring the calculator to life. The JavaScript will handle user interactions like clicking buttons, performing calculations, and updating the display based on user input.
// Get the display element and all button elements
const display = document.getElementById('display');
const buttons = document.querySelectorAll('.btn');

// Initialize a variable to store the current calculation input
let currentInput = '';

// Add event listeners for each button
buttons.forEach(button => {
  button.addEventListener('click', (e) => {
    const value = e.target.textContent; // Get the value of the clicked button

    if (value === 'C') {
      // If 'C' is clicked, clear the display and reset the input
      currentInput = '';
      display.value = '';
    } else if (value === '←') {
      // If '←' is clicked, remove the last character from input
      currentInput = currentInput.slice(0, -1);
      display.value = currentInput;
    } else if (value === '=') {
      // If '=' is clicked, evaluate the expression and show the result
      try {
        currentInput = eval(currentInput).toString(); // Use eval() to evaluate the math expression
        display.value = currentInput;
      } catch (error) {
        // If the expression is invalid, display 'Error'
        display.value = 'Error';
        currentInput = '';
      }
    } else {
      // For other buttons (numbers and operators), append the value to the current input
      currentInput += value;
      display.value = currentInput; // Update the display with the current input
    }
  });
});
Source: Calculator js
Explanation of JavaScript:
If you're interested in learning how to build a calculator in C, we invite you to explore our detailed tutorial. This step-by-step guide will walk you through the process of creating a functional calculator program using C.
Building a calculator in JavaScript using HTML and CSS is a practical way to strengthen your web development skills. As you create the interface, style the layout, and add interactive features with JavaScript, you'll gain a better understanding of how front-end applications work.
Once your calculator is complete, try adding features such as keyboard support, calculation history, or scientific functions. Building and improving projects like this will strengthen your portfolio and prepare you for more advanced web development challenges.
To build a calculator using HTML, CSS, and JavaScript:
Start by creating an HTML layout, style it with CSS, and add interactivity using JavaScript to make the calculator work.
To style your calculator using CSS:
Example: You can make buttons have a smooth transition on hover using transition: background-color 0.3s ease;.
To create a responsive calculator layout:
@media (max-width: 600px) {
.calculator-container {
width: 100%;
}
}
To link CSS and JavaScript files in an HTML document:
1. In your HTML file, link the CSS file inside the <head> section:
html
<link rel="stylesheet" href="style.css" />
2. Link the JavaScript file before the closing </body> tag:
<script src="script.js"></script>
In JavaScript, you can handle the logic for a calculator by:
Example:
document.querySelector('.btn').addEventListener('click', function() {
// Process button click
// Update the display
});
Common mistakes when building a calculator using JavaScript include:
To implement keyboard support in your JavaScript calculator:
Example:
document.addEventListener('keydown', function(event) {
if (event.key === '1') {
// Add '1' to the input
}
if (event.key === 'Enter') {
// Evaluate the expression
}
});
To prevent multiple decimal points in a number:
Example:
if (!currentInput.includes('.')) {
currentInput += '.';
}
To debug JavaScript errors in your calculator:
Example:
try {
let result = eval(currentInput);
} catch (e) {
console.error('Error:', e);
display.value = 'Error';
}
To clear the display in a JavaScript calculator, you need to:
Example:
document.getElementById('clear').addEventListener('click', function() {
currentInput = '';
display.value = '';
});
To optimize the performance of a JavaScript calculator:
418 articles published
Rohan Vats is a Senior Engineering Manager with over a decade of experience in building scalable frontend architectures and leading high-performing engineering teams. Holding a B.Tech in Computer Scie...
Get Free Consultation
By submitting, I accept the T&C and
Privacy Policy
Top Resources
Certification
3 Months
Certification
6 Months
O.P. Jindal Global University
Masters in International Accounting and Finance (Accredited by ACCA, UK)Master's Degree
12 Months