Git Installation on Windows: A Complete Step-by-Step Guide
By Sriram
Updated on Jul 21, 2026 | 14 min read | 4.48K+ views
Share:

All courses
Certifications
More
By Sriram
Updated on Jul 21, 2026 | 14 min read | 4.48K+ views
Share:
Table of Contents
Quick Overview
In this blog, you will learn how to install Git on Windows 10 and Windows 11, step by step. We will cover downloading the right installer, walking through the setup screens, configuring Git after installation, and checking if Git is installed correctly.
If working through Git installation on Windows has you thinking about what comes next, like managing branches, collaborating on real projects, and building a proper development workflow, upGrad's Data Science Courses can help you build those skills from the ground up.
Popular Data Science Programs
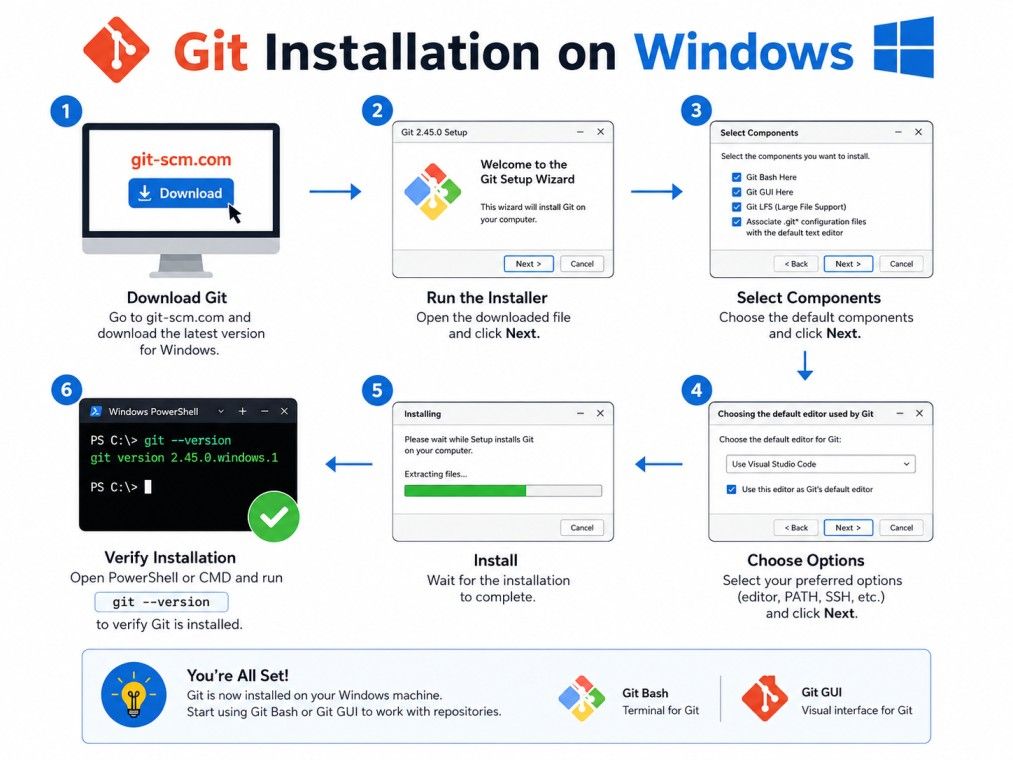
The most common way to get Git installation on Windows done is through the official standalone installer from the Git for Windows project. This is the method most tutorials, courses, and companies recommend because it is stable, well maintained, and works across all recent Windows versions.
Here is the basic process:
This method installs Git along with Git Bash, a command-line tool that lets you run Git commands and basic Linux-style commands on Windows. It also gives you the option to install Git GUI, a simple visual interface for people who prefer clicking over typing commands.
You do not need any special technical background to do this. The installer guides you through each screen with sensible defaults. If you are unsure about an option during setup, the default settings work fine for most beginners. You can always change these settings later through Git configuration commands.
One thing worth noting: git installation on Windows does not require you to restart your computer in most cases. Once the installer finishes, Git is ready to use immediately through Git Bash or Command Prompt, depending on how you configured the PATH setting during installation.
The next sections break down each part of this process in more detail, starting with what Git Bash actually is and why it matters.
Also Read: What is Git? Git Commands, Repositories, Branches and Workflow
Free Courses
Git Bash is a command-line application that comes bundled with Git for Windows. It gives Windows users a Unix-like terminal experience, which matters because Git was originally built for Linux systems.
Many Git tutorials and documentation assume you are using a Bash-style terminal, so having Git Bash makes following along much easier.
Command Prompt is Windows' native command-line tool. It can run Git commands too, but it lacks many of the Unix commands developers use daily, like grep, ls, or ssh in their native form. Git Bash fills that gap.
Feature |
Git Bash |
Command Prompt |
| Unix-style commands | Yes | No |
| Git commands support | Full support | Full support |
| Tab completion for Git | Yes | Limited |
| Familiar to Linux/Mac users | Yes | No |
PowerShell is more powerful than Command Prompt and supports Git commands well too. However, it uses its own scripting syntax, which differs from Bash.
If you plan to follow online Git tutorials, most of them use Bash-style syntax, so Git Bash tends to be the easier starting point for beginners.
Git GUI is a separate visual tool that also installs with Git for Windows. It lets you stage changes, commit, and view history through buttons and menus instead of typed commands.
Beginners sometimes start with Git GUI and move to Git Bash once they get comfortable with commands.
Both work fine, but most professional developers eventually rely on Git Bash or a terminal because it is faster once you know the commands.
Also Read: Git Tutorial For Beginners: Learn Git from Scratch
Data Science Courses to upskill
Explore Data Science Courses for Career Progression
IIIT Bangalore
Executive Post Graduate Certificate in Data Science & AIPlacement Assistance
Before you begin git installation on Windows, it helps to check whether Git already exists on your machine. Some systems come with Git pre-installed, especially if you have used tools like GitHub Desktop, VS Code, or certain developer setups before.
To check if git is installed on Windows, open Command Prompt or PowerShell and type:
git --version
If Git is installed, this command shows the version number, something like git version 2.44.0. If it is not installed, you will see an error message saying the command is not recognized.
Why does this check matter?
If you find an old version installed, you do not need to uninstall it first. Running the newer installer will usually update it automatically. But if you plan to switch installation methods, say from the standalone installer to Winget, it is cleaner to uninstall the old version first to avoid conflicts.
This step takes less than a minute but can save you real trouble later, especially if you are setting up a new laptop or a work machine that already has some developer tools installed.
If you're looking to build expertise in software development and version control, upGrad's Executive Diploma in Data Science & Artificial Intelligence from IIITB gives you the coding and project collaboration skills to work confidently on real-world development teams.
Before you download anything, it helps to know which version and which tool actually fits your needs. Git installation on Windows offers a few choices, and picking the right one avoids rework later.
Almost every Windows machine sold in the last decade runs a 64-bit operating system. Unless you are using a very old laptop, go with the 64-bit installer. You can check your system type by going to Settings, then System, then About on Windows 10 or 11.
Yes, Git is completely free and open source. There are no hidden costs, subscriptions, or premium tiers. The same applies to Git Bash, Git GUI, and all the core tools that come with the installer.
These three tools often confuse beginners because they all relate to Git in some way.
Tool |
What It Is |
Best For |
| Git for Windows | Core Git software plus Git Bash and Git GUI | Command-line users, developers who want full control |
| GitHub Desktop | Visual app built on top of Git, tied closely to GitHub | Beginners who prefer a simple visual workflow |
| SourceTree | Visual Git client by Atlassian, supports GitHub and Bitbucket | Teams already using Atlassian products like Jira |
If you are learning Git for the first time, installing Git for Windows directly gives you the strongest foundation. GitHub Desktop and SourceTree are useful later once you understand what is happening behind the visual buttons.
While the standalone installer is the most common route, it is not the only one. Depending on your workflow, other methods might suit you better.
This is the recommended method for most users. Download it from the official Git for Windows site and run through the setup wizard. It gives you full control over configuration options during install.
Windows Package Manager, or Winget, comes built into recent Windows 10 and Windows 11 versions. Open Command Prompt or PowerShell and run:
winget install --id Git.Git -e --source winget
This installs Git without needing to visit a website or manually run an installer file. It is fast and works well for developers comfortable with command-line tools.
Chocolatey is a third-party package manager for Windows. If you already use Chocolatey for managing other software, you can install Git with:
choco install git
This method requires Chocolatey to be set up first, so it is better suited for users who already rely on it.
Portable Git does not require installation at all. You download a zipped version, extract it anywhere on your system, and run Git directly from that folder.
This works well on restricted machines where you cannot install software normally, such as office laptops with limited admin rights.
Both GitHub Desktop and Visual Studio Code can prompt you to install Git if it is missing when you first use their Git-related features. This is convenient if you already plan to use these tools, since Git gets installed as part of the setup flow.
Subscribe to upGrad's Newsletter
Join thousands of learners who receive useful tips
This section covers the full git installation on Windows steps using the standalone installer, which works the same way whether you install git on Windows 10 or Windows 11.
Step 1: Go to the official Git for Windows download page and click the download button. The site automatically detects your system and offers the correct installer.
Step 2: Once downloaded, double-click the .exe file to launch the installer.
Step 3: Accept the GNU license agreement and click Next.
Step 4: Choose the installation location. The default folder works fine unless you have a specific reason to change it.
Step 5: Select components. The default selections include Git Bash, Git GUI, and a few shell integration options. Keep these unless you have a specific reason to remove them.
Step 6: Choose your default editor. Options include Vim, Notepad, VS Code, and others. If you are new to command-line editors, select Notepad or VS Code for simplicity.
Step 7: Choose how Git handles PATH. The recommended option lets Git be used from Git Bash, Command Prompt, and PowerShell. This is the safest choice for beginners.
Step 8: Choose the SSH executable to use. The default option works for most users.
Step 9: Choose the HTTPS transport backend. Keep the default unless your organisation has specific requirements.
Step 10: Configure line ending conversions. The default option, checkout Windows-style and commit Unix-style, works well for most projects.
Step 11: Choose your terminal emulator for Git Bash. The default MinTTY option offers a better experience than the standard Windows console.
Step 12: Configure extra options like file system caching and credential helper. Defaults are fine here too.
Step 13: Review your selections and click Install.
Step 14: Once installation completes, launch Git Bash to confirm everything works.
Once git installation on Windows is complete, a few configuration steps make Git ready for actual use.
Open Git Bash and run:
git config --global user.name "Your Name"
git config --global user.email "your.email@example.com"
This information gets attached to every commit you make, so keep it accurate.
Git Credential Manager stores your login details securely so you do not need to enter your username and password every time you push code. It comes bundled with the standard Windows installer and activates automatically in most cases.
Global configuration applies to every Git repository on your system. Local configuration applies only to a specific project folder. Use local settings when a particular project needs a different email address or editor, such as work versus personal projects.
If you skipped the PATH option during installation, or if Git commands are not working outside Git Bash, you can add Git manually:
After finishing the installation, always verify it worked correctly before moving on to real projects.
git --version
You should see the installed version number displayed. This confirms Git installation on Windows is complete and functioning.
You can also test Git Bash separately by opening it from the Start menu and typing a basic command like pwd to check your current directory. If Git Bash opens and responds normally, your setup is working as expected.
git init test-folder
If this creates a new folder with Git tracking enabled, your installation is fully functional and ready for real use.
Even a simple process like git installation on Windows can run into hiccups. Here are the most common issues and their fixes.
1. Git Not Recognized as Internal or External Command
This usually means Git was not added to PATH during installation. Reinstall Git and choose the option that adds Git to PATH, or add it manually through Environment Variables.
2. Git Bash Not Opening After Install
Try restarting your system. If the issue persists, uninstall Git completely and run the installer again with default settings.
3. Installation Stuck or Frozen
This often happens due to antivirus software interfering with the installer. Temporarily disable your antivirus, or run the installer as an administrator.
4. Git Path Not Set Correctly
Check your Environment Variables and confirm the Git installation folder appears under the Path variable. Restart your terminal after making changes.
5. SSL Certificate Errors
This can happen on corporate networks with custom security certificates. Run git config --global http.sslVerify false as a temporary fix, though this is not recommended for long-term use on sensitive projects.
6. Permission Denied Errors
These typically occur with SSH key setup rather than installation itself. Confirm your SSH key is added correctly to your Git hosting account.
7. Installer Fails to Run
Make sure you downloaded the correct installer for your system architecture, and confirm the download completed fully without corruption.
A few habits make working with Git smoother over time.
New versions fix bugs and security issues. Check for updates every few months.
Your global config file sits at ~/.gitconfig. Keep a copy if you switch machines often.
This avoids mixing personal and work identities across different repositories.
If you need to start fresh, go to Settings, then Apps, then find Git in the list and click Uninstall. This removes Git Bash and Git GUI along with the core program.
Reinstalling afterward follows the same steps covered earlier in this guide. A clean reinstall often resolves persistent issues that regular troubleshooting could not fix.
Git installation on Windows is a straightforward process once you understand each step. Download the right installer, walk through the setup screens with sensible defaults, configure your username and credentials, and verify everything works with a simple version check. Whether you choose the standalone installer, Winget, or Chocolatey, the end result is the same: a working Git setup ready for real projects.
If you run into errors, most issues trace back to PATH configuration or antivirus interference, both of which have simple fixes. Once Git is installed and verified, you are ready to start tracking changes, collaborating with teams, and building projects with proper version control.
Want personalized guidance on Data Science and upskilling? Speak with an expert for a free 1:1 counselling session today.
Git itself takes up roughly 250 to 300 MB of disk space after installation. This includes Git Bash, Git GUI, and all core components. It is a lightweight tool compared to most development software, so storage is rarely a concern.
Git releases new versions regularly, usually every few months. Always download the latest version from the official Git for Windows website rather than relying on older cached installers, since newer versions include security patches and bug fixes.
Yes, you can use the Portable Git option, which does not require installation or admin permissions. Simply download the zipped version, extract it to any folder, and run Git directly from there without touching system files.
Yes, Git commands work fine in Command Prompt as long as Git was added to your system PATH during installation. If commands are not recognized, check your PATH settings or reinstall with the PATH option enabled.
The standalone installer gives you a visual setup wizard with configuration options at each step. Winget installs Git through a single command line instruction with default settings, which is faster but offers less control during setup.
Not strictly, since WSL gives you a full Linux environment with Git available natively. However, many Windows users still prefer Git Bash for its simplicity and lighter footprint compared to running a full WSL distribution.
After installation, configure your username and email, set up credential management, and verify the installation with a version check. From there, you can initialise a repository or clone an existing project to start working.
No, a restart is usually not required. Once the installer finishes, Git works immediately through Git Bash. If you added Git to PATH manually after installation, you may need to restart your terminal window, not your entire system.
Run git --version in your terminal after installation. This displays the exact version number installed, confirming both that Git works and which release you are running.
Yes, installing both is common and causes no conflicts. GitHub Desktop actually relies on Git working underneath its visual interface, so having both gives you flexibility to switch between command-line and visual workflows.
This usually happens when Git Credential Manager is not set up correctly, or when you are using HTTPS instead of SSH for authentication. Setting up Credential Manager properly during installation solves this in most cases.
724 articles published
Sriram K is a Senior SEO Executive with a B.Tech in Information Technology from Dr. M.G.R. Educational and Research Institute, Chennai. With over a decade of experience in digital marketing, he specia...
Speak with Data Science Expert
By submitting, I accept the T&C and
Privacy Policy
Start Your Career in Data Science Today
Top Resources
Executive Diploma
12 Months
Master's Degree
18 Months
Bootcamp
6 Months