Install MongoDB on Windows: Step-by-Step Guide
By Sriram
Updated on Jul 23, 2026 | 14 min read | 4.47K+ views
Share:

All courses
Certifications
More
By Sriram
Updated on Jul 23, 2026 | 14 min read | 4.47K+ views
Share:
Table of Contents
Quick Overview
This blog walks you through the entire process from start to finish. You will learn how to download and install MongoDB on Windows, set up the data directory, add MongoDB to your system PATH, run it as a Windows service, and fix the errors that trip up most beginners.
If topics like working with databases, structuring data efficiently, and building backend systems that can handle real-world applications interest you, upGrad's Data Science courses can help you build the skills to work with the tools and systems behind them.
Popular Data Science Programs
Before jumping into the steps, it helps to understand what installing MongoDB on Windows involves. It is not just one download and click next. There are a few moving parts: the database server itself (mongod), the shell to interact with it (mongosh), and optionally a GUI tool called Compass.
Here is a quick look at what the process covers:
Step |
What it does |
| Download MongoDB | Get the installer from the official site |
| Install MongoDB | Run the MSI setup wizard |
| Set up data directory | Choose where MongoDB stores your data |
| Configure PATH | Let Windows recognize MongoDB commands anywhere |
| Run as a service | Start MongoDB automatically with Windows |
| Verify installation | Confirm everything works |
MongoDB Community Edition is free, and it works on Windows 10 and Windows 11 without any licensing cost. This is the version most developers and students use for local development, and it is the one this guide focuses on.
The whole process usually takes 10 to 15 minutes if you follow the steps in order. Most problems people run into come from skipping the PATH setup or not creating the data folder correctly, so pay close attention to those two sections.
If you have searched for how to install MongoDB on Windows before and gotten stuck partway through, this guide is written to walk you through every part of the process without assuming prior experience.
Once installed, MongoDB runs quietly in the background as a Windows service. You will not need to manually start it every time you restart your computer, unless you choose to configure it that way. This makes it convenient for ongoing development work, whether you are building with Node.js, Python, or any other backend framework.
Also Read: Understanding MongoDB Architecture: Key Components, Functionality, and Advantages.
Free Courses
Before you install MongoDB on Windows, it is worth checking whether your system meets the basic requirements. This saves you from running into issues halfway through the setup.
MongoDB releases new versions regularly, and not every version supports every Windows edition. As a general rule:
MongoDB Community Edition works on:
32-bit versions of Windows are not supported by recent MongoDB releases. If you are running an older or 32-bit system, you will need to use an older MongoDB version, which is not recommended for new projects.
You do not always need administrator rights to install MongoDB on Windows. There are two paths:
Once you have confirmed these basics, you are ready to download and install MongoDB on Windows and move through the remaining steps to install MongoDB on Windows without interruption.
If you're looking to break into this space or move up in your career, the Master of Science in Data Science from Liverpool John Moores University, offered in collaboration with upGrad, gives you the credentials and skills to get there.
Data Science Courses to upskill
Explore Data Science Courses for Career Progression
IIIT Bangalore
Executive Post Graduate Certificate in Data Science & AIPlacement Assistance
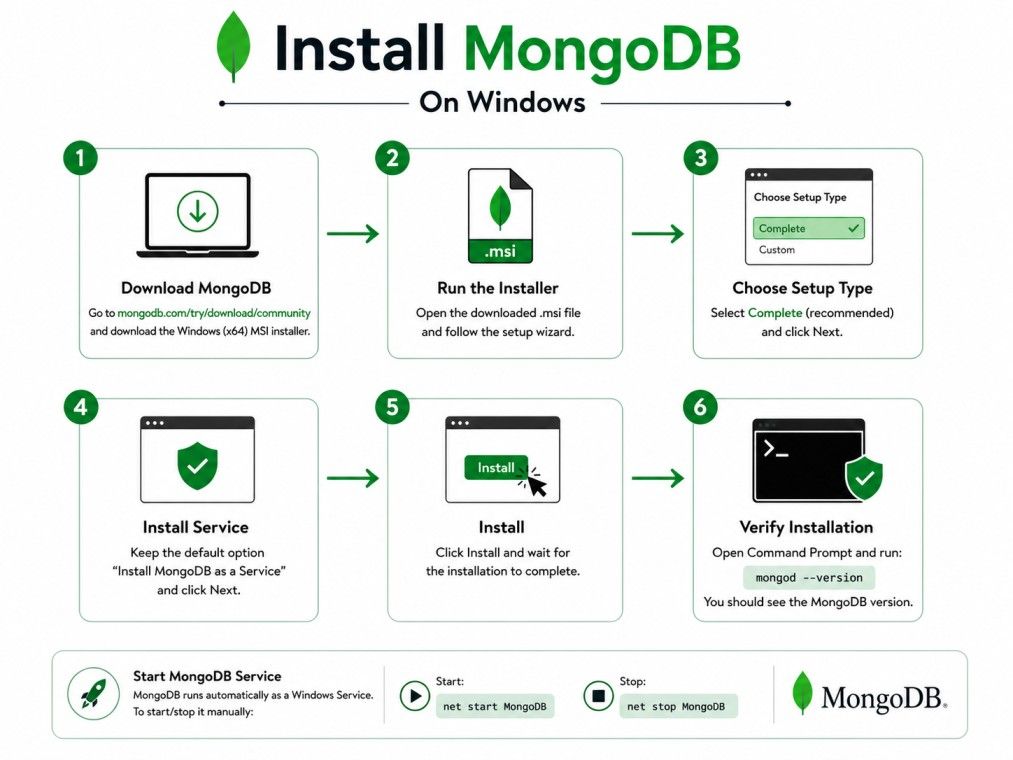
Installing MongoDB on Windows consists of a series of steps listed below
The first real step in installing MongoDB on Windows is to download the installer file. MongoDB offers a free Community Server edition, which is what most developers use for local setups.
Go to the official MongoDB download center and select:
The MSI package is the easiest way to download and install MongoDB on Windows because it comes with a guided setup wizard.
There is also a ZIP option, which is useful if you want a portable install without admin rights; it is covered later in this guide.
Edition |
Best for |
Cost |
| Community Server | Individual developers, learning, small projects | Free |
| Enterprise Server | Businesses needing advanced security and support | Paid |
For almost everyone reading this guide, Community Server is the right choice. It has everything you need to learn MongoDB and build real applications.
Once the download finishes, you will have a file that looks something like mongodb-windows-x86_64-x.x.x-signed.msi. Confirm it matches the version and architecture (64-bit) you selected. This small check avoids a common issue where people accidentally download the wrong build and the installer fails partway through.
At this point, you have successfully completed the first part of how to download and install MongoDB on Windows.
The next step is running the installer itself, which is where the actual setup happens.
Keep the installer file somewhere easy to find, like your Downloads folder or Desktop, since you will run it directly in the next step.
Also Read: Top 10 MongoDB Tools for 2025: Essential Tools for Students and Developers
Now that you have the installer, it is time to actually install MongoDB on Windows. This is the core part of the steps to install MongoDB on Windows, and getting it right here saves you trouble later.
Setup Type |
What it does |
Recommended for |
| Complete | Installs everything with default settings and paths | Most beginners |
| Custom | Lets you choose install location and components | Advanced users with specific needs |
For most people following the steps to install MongoDB on Windows for the first time, Complete is the simpler and safer choice.
During installation, you will see an option labeled Install MongoDB as a Service. Keep this checked.
This tells Windows to run MongoDB automatically in the background, so you do not have to start it manually every time.
You will also see two service configuration options:
Stick with the default unless you have a specific reason not to.
The installer also gives you the option to install MongoDB Compass, a graphical tool for viewing and managing your database. It is optional but genuinely useful for beginners, since it lets you browse your data visually instead of typing every command in the shell.
Click Install, wait for the process to complete, then click Finish. Windows may ask for permission during installation. This is normal.
At this point, MongoDB is technically installed on your machine. But there are a few more steps before it is fully ready to use, starting with setting up where your data actually lives.
Also Read: Most Common MongoDB Commands for MongoDB Beginners
MongoDB needs a dedicated folder to store your databases, collections, and documents. This is called the data directory, and setting it up correctly is one of the most important steps to install MongoDB on Windows successfully.
By default, MongoDB looks for data at:
C:\data\db
If this folder does not already exist, MongoDB will fail to start, and you will see an error when you try to run it. This is one of the most common issues beginners run into, so do not skip this step.
Open Command Prompt and run:
md \data\db
Alternatively, you can create the folders manually using File Explorer:
If you prefer to store your data somewhere other than the default location, you can specify a custom path when starting MongoDB:
mongod --dbpath "D:\mongodb-data"
Just make sure the folder exists before you run this command, or MongoDB will throw an error.
MongoDB also uses a configuration file, typically located at:
C:\Program Files\MongoDB\Server\<version>\bin\mongod.cfg
This file controls settings like the data path, log path, and network port. If you installed MongoDB as a service, this config file is what the service reads on startup. Opening it in a text editor lets you see (and change) where your data and logs are actually stored.
Similarly, MongoDB stores its logs at a default path, usually:
C:\Program Files\MongoDB\Server\<version>\log\mongod.log
Checking this log file is often the fastest way to figure out what went wrong if MongoDB does not start properly.
Once your data directory is in place, you are ready to move on to making MongoDB accessible from anywhere on your system.
This step is easy to skip, but it makes a real difference in how smoothly you can use MongoDB day to day.
Without adding MongoDB to your PATH, you would need to type the full file path every time you want to run a MongoDB command, like:
"C:\Program Files\MongoDB\Server\7.0\bin\mongod.exe"
That gets tedious fast. Adding MongoDB to the PATH lets you simply type mongod or mongosh from any folder in Command Prompt, without the long path.
C:\Program Files\MongoDB\Server\<version>\bin
Open a new Command Prompt window (this part matters, old windows will not pick up the change) and type:
mongod --version
If this shows a version number instead of an error, your PATH is set up correctly.
A lot of people add the wrong folder to the PATH, like the main MongoDB install folder instead of the bin subfolder. Double-check that the path you added ends in \bin, since that is where the actual executable files live.
This step is small but it solves one of the most frequent complaints people have when they install MongoDB on Windows: the dreaded "not recognized as an internal or external command" error, which we will cover in detail later in this guide.
One of the advantages of installing MongoDB with the MSI installer is that it can run as a Windows service. This means MongoDB starts automatically in the background whenever your computer boots up, and you do not need to manually launch it every time.
Open Command Prompt and type:
sc query MongoDB
If the status shows RUNNING, MongoDB is already active in the background.
If it is not running, start it with:
net start MongoDB
You should see a message confirming the service started successfully.
If you ever need to stop MongoDB, run:
net stop MongoDB
This is useful when troubleshooting or when you want to run mongod manually instead of through the service.
Sometimes a restart fixes issues faster than digging into logs. To restart MongoDB, simply stop and start it again:
net stop MongoDB
net start MongoDB
You can also do this through the Services app in Windows. Search for "Services" in the Start menu, find MongoDB Server, right-click it, and choose Restart.
If you prefer not to run MongoDB as a background service, you can start it manually anytime with:
mongod
Just remember this only works while that Command Prompt window stays open. Closing it stops the database.
Method |
Best for |
| Windows Service | Ongoing development, convenience |
| Manual (mongod command) | Testing, temporary sessions, learning |
For most day-to-day development, letting MongoDB run as a service is the more practical choice, since you will not need to remember to start it every time.
Once MongoDB is running, you need a way to actually talk to it. That is where mongosh, the MongoDB Shell, comes in.
mongosh is a command-line tool that lets you connect to your MongoDB server, run queries, and manage your databases directly from the terminal. It replaced the older mongo shell in recent MongoDB versions.
In newer MongoDB installers, mongosh is not always bundled automatically. If it was not installed alongside your server, download it separately from the official MongoDB Shell download page, selecting the Windows MSI package.
Run the installer the same way you did for the main MongoDB package, following the setup wizard prompts.
Open Command Prompt and type:
mongosh
If MongoDB is running and your PATH is set up correctly, this connects you directly to your local instance, and you will see a prompt that looks something like:
test>
This confirms mongosh is talking to your MongoDB server successfully.
Once connected, here are a few commands worth knowing:
Some beginners try to skip the shell and go straight to Compass, the GUI tool. That is fine for browsing data visually, but mongosh gives you more control and is closer to what you will use in real production environments and scripts. Learning it early pays off.
With mongosh connected, you are now ready to confirm everything is working correctly.
After you install MongoDB on Windows, it is worth taking a minute to confirm everything is actually working before you start building anything on top of it.
Open Command Prompt and run:
mongod --version
This should return details about your installed MongoDB version, including the build environment. If you get an error instead, it usually means your PATH was not configured correctly in Step 4.
Similarly, check your shell version with:
mongosh --version
Run this to make sure MongoDB is active:
sc query MongoDB
Look for STATE: RUNNING in the output.
The most reliable way to verify your install MongoDB on Windows setup worked is simply connecting via mongosh:
mongosh
If you land on the test> prompt without any connection errors, your installation is complete and working.
Check |
Command |
Expected Result |
| MongoDB version | mongod --version | Version number displayed |
| Shell version | mongosh --version | Version number displayed |
| Service status | sc query MongoDB | STATE: RUNNING |
| Connection test | mongosh | Connects to test> prompt |
If all four checks pass, your MongoDB installation on Windows is fully functional and ready for actual use.
Now that MongoDB is installed and verified, let's create something real. This is the natural next step after any MongoDB Windows setup.
Open mongosh and run:
use myFirstDatabase
MongoDB does not actually create the database until you add data to it. This is a common point of confusion for beginners, so do not worry if show dbs does not immediately show your new database yet.
Collections in MongoDB are similar to tables in relational databases. To create one and add your first document, run:
db.users.insertOne({ name: "Alex", age: 28, city: "Delhi" })
This creates a collection called users (if it does not already exist) and inserts one document into it.
Now run:
show dbs
You should see myFirstDatabase in the list, since it now contains actual data.
To view what you just inserted:
db.users.find()
This returns the document you added, confirming your database and collection are working correctly.
A lot of guides stop at installation and verification, but actually creating and querying data is what confirms your setup works end to end. It also gives you a small, practical starting point for building your actual application on top of MongoDB.
From here, you can start connecting your application code (Node.js, Python, Java, or whatever stack you are using) to this same local MongoDB instance.
If typing commands in mongosh is not your preference, MongoDB Compass gives you a visual way to work with your database.
Compass is MongoDB's official GUI application. It lets you browse databases, view documents, run queries, and analyze your schema, all through a visual interface instead of the command line.
If you selected Compass during the main installer setup in Step 2, it is already installed on your machine. If not, download it separately from the official MongoDB Compass download page and run the installer the same way.
Open Compass and use this connection string to connect to your local instance:
mongodb://localhost:27017
Click Connect, and you should see all your existing databases listed, including the one you created in the previous section.
Both tools serve different purposes:
Many developers use both, depending on the task. Compass is especially helpful for beginners who are still getting comfortable with MongoDB's query syntax.
Installing Compass is entirely optional. It does not affect your core MongoDB installation on Windows, and you can install or uninstall it anytime without impacting your database or data.
Subscribe to upGrad's Newsletter
Join thousands of learners who receive useful tips
If you do not have administrator rights on your Windows machine, you can still install MongoDB on Windows using the ZIP archive method. This does not require any elevated permissions.
Go to the official MongoDB download page and select the ZIP package instead of MSI, for the Windows platform.
Right-click the downloaded ZIP file and choose Extract All. Pick a folder location you have full access to, such as your Documents or a folder on your Desktop.
Inside the extracted folder, navigate to the bin subfolder. This contains mongod.exe, mongosh.exe, and other executable files you need.
Since there is no installer setting up a service for you, you need to manually create a data folder first (see Step 3 earlier in this guide for details), then run:
mongod --dbpath "C:\your-custom-path\data"
Replace the path with a folder you have permission to write to.
Open a separate Command Prompt window, navigate to the same bin folder, and run:
mongosh
This connects to your manually running MongoDB instance.
Aspect |
ZIP Method |
MSI Installer |
| Admin rights needed | No | Yes |
| Runs as Windows service | No, manual start required | Yes, automatic |
| Setup complexity | Slightly more manual steps | Guided wizard |
| Best for | Restricted work laptops, portable setups | Most personal machines |
This method is a solid workaround if you are on a managed work laptop or student system where you cannot install software normally, but still need to install MongoDB on Windows for a project or assignment.
Even with careful steps, things can go wrong. Here are the most common issues people hit when they install MongoDB on Windows, and how to fix each one.
This almost always means MongoDB is not added to your Windows PATH correctly.
Fix: Go back to Step 4, confirm the path you added ends in \bin, and make sure you opened a new Command Prompt window after making the change.
This usually happens when the data directory does not exist or Windows does not have write permission to it.
Fix: Confirm C:\data\db (or your custom data path) exists and is not read-only. Check the mongod.log file for the exact error message.
This means mongosh is trying to connect, but nothing is listening on that port.
Fix: Check if the MongoDB service is running using sc query MongoDB. If it is stopped, start it with net start MongoDB.
Similar to the PATH issue above, but sometimes caused by a typo in the folder name added to PATH.
Fix: Re-check the exact folder path in Environment Variables, matching your installed MongoDB version number exactly.
MongoDB's default port might be occupied by another running instance or a different application.
Fix: Run netstat -ano | findstr :27017 to see what is using the port, close that process, or start MongoDB on a different port using mongod --port 27018.
This Windows-specific error usually points to a corrupted service configuration or a permissions conflict.
Fix: Uninstall MongoDB, delete leftover files in C:\Program Files\MongoDB, then reinstall using the MSI installer with the "Install as Service" option checked again.
Error |
Likely Cause |
Fix |
| Not recognized as a command | PATH not set | Re-check Step 4 |
| Service not starting | Missing data folder | Create C:\data\db |
| Connection refused | Service stopped | Run net start MongoDB |
| Port already in use | Another process on 27017 | Free port or use a new one |
| Error 1053 | Corrupted service | Reinstall MongoDB |
How you install MongoDB on Windows can vary slightly depending on what you are building. Here is a quick look at two common scenarios.
If you are building a backend with Node.js, the installation steps stay the same, but you will additionally need to:
Since MongoDB runs as a background service after installation, your Node.js app can connect to it anytime without extra setup steps.
For general local development, whether it is a personal project, coursework, or testing:
Local development setups do not usually need custom ports, authentication, or advanced configuration. The default install MongoDB on Windows steps covered earlier in this guide are enough for almost all learning and personal project scenarios.
If you ever need to remove MongoDB, whether to reinstall a cleaner version or free up space, here is how to do it properly.
Uninstalling through Control Panel does not always remove everything. Manually delete these folders if they still exist:
Be careful with the data folder. If you have important databases stored there, back them up before deleting anything.
Go back to Environment Variables (same place as Step 4) and remove the MongoDB bin folder entry from the Path variable, since it is no longer needed once MongoDB is uninstalled.
Also Read: The Future Scope of MongoDB: Advantages, Improvements & Challenges
Installing MongoDB on Windows is not complicated once you understand the individual pieces: downloading the right package, setting up your data directory, configuring the PATH, and getting the service running. Most of the confusion beginners face comes down to a missing data folder or an incomplete PATH setup, both of which are easy to fix once you know where to look.
Whether you used the MSI installer or the ZIP method, you should now have a working local MongoDB instance, complete with mongosh for command-line access and optionally Compass for a visual interface. From here, you are ready to connect this database to your actual application, whether that is a Node.js backend, a Python project, or anything else you are building.
Want personalized guidance on Data Science and upskilling? Speak with an expert for a free 1:1 counselling session today.
MongoDB Community Edition no longer officially supports Windows 7 in its recent releases. If you need MongoDB on an older machine, you will have to use an older, unsupported MongoDB version, which is not recommended for new projects due to missing security updates and features.
No, Compass is completely optional. MongoDB works fully through the command line using mongosh. Compass is simply a visual tool that makes browsing and managing data easier for people who prefer a graphical interface over typing commands.
By default, MongoDB runs on port 27017. You can confirm this by checking your mongod.cfg file or by running netstat -ano | findstr :27017 in Command Prompt to see if something is actively listening on that port.
Yes, you can run multiple instances by starting each one with a different data path and port number, for example mongod --dbpath "D:\data2" --port 27018. This is useful for testing different configurations without them interfering with each other.
In some recent MongoDB installers, mongosh is bundled together with the main installation. In others, you may need to download it separately from MongoDB's official shell download page. Always check after installing whether the mongosh command works before assuming it is missing.
This usually happens if you have not created any databases yet, since MongoDB does not save a database until it contains actual data. Create a collection and insert a document using mongosh first, then refresh Compass to see it appear.
Yes, you can. Update the dbpath setting in your mongod.cfg file to point to the new folder location, then restart the MongoDB service. Make sure the new folder already exists and has proper write permissions before restarting.
Running MongoDB as a background service uses some system resources, but the impact is minimal for typical development workloads. If you are on a lower-spec machine, you can stop the service manually when not in use and start it only when needed.
MongoDB Community is the version you install locally on your own machine, like the setup covered in this guide. MongoDB Atlas is a cloud-hosted version managed by MongoDB itself, useful when you want a database accessible from anywhere without managing the server yourself.
Download the latest MSI installer from the official MongoDB site and run it. The installer usually detects your existing installation and offers to upgrade it, keeping your existing data intact. Always back up your data folder before performing a major version upgrade.
Some antivirus programs mistakenly flag MongoDB's server executable due to its network activity and background service behavior. This is typically a false positive. Confirm you downloaded MongoDB from the official website, then add an exception in your antivirus settings if needed.
698 articles published
Sriram K is a Senior SEO Executive with a B.Tech in Information Technology from Dr. M.G.R. Educational and Research Institute, Chennai. With over a decade of experience in digital marketing, he specia...
Speak with Data Science Expert
By submitting, I accept the T&C and
Privacy Policy
Start Your Career in Data Science Today
Top Resources
Executive Diploma
12 Months
Master's Degree
18 Months
Bootcamp
6 Months