


GitHub is possibly the most famous and widely used open-source platform amongst developers. Launched by Linus Torvalds in 2005, Git is a version control software and collaboration platform that initially only supported Linus kernel.
Top Machine Learning and AI Courses Online
Git is used as a storage space for the content which is programming code written by different programmers, designers, and developers. It isn’t necessarily written by a single developer, more often than multiple developers are working on real-life projects. Git eliminates any conflicts and facilitates coordination between developers.
Git is basically a code-hosting platform where there is uninterrupted accessibility to open-source programming frameworks, libraries, and languages. It hosts the largest community of tech developers in the world.

Trending Machine Learning Skills
Enrol for the Machine Learning Course from the World’s top Universities. Earn Masters, Executive PGP, or Advanced Certificate Programs to fast-track your career.
Git also allows users to store the previous iterations of code in a historical form which can be revisited and reviewed as required. It consists of a branch system to help developers work independently on separate tasks. It also allows you to host a website from your repository.
GitHub’s large base is used to deduce useful insights on programming languages and frameworks. For instance, as per its annual The State of the Octoverse report, the most popular GitHub project of 2019 was the open-source Microsoft/vscode with 19,100 contributors.
In this article, we will take a look at the installation process of Git, and find out how to use GitHub. So let’s get started!
How to install Git?
Step 1: Create an account on GitHub.
Visit GitHub‘s Sign Up page and create your account.
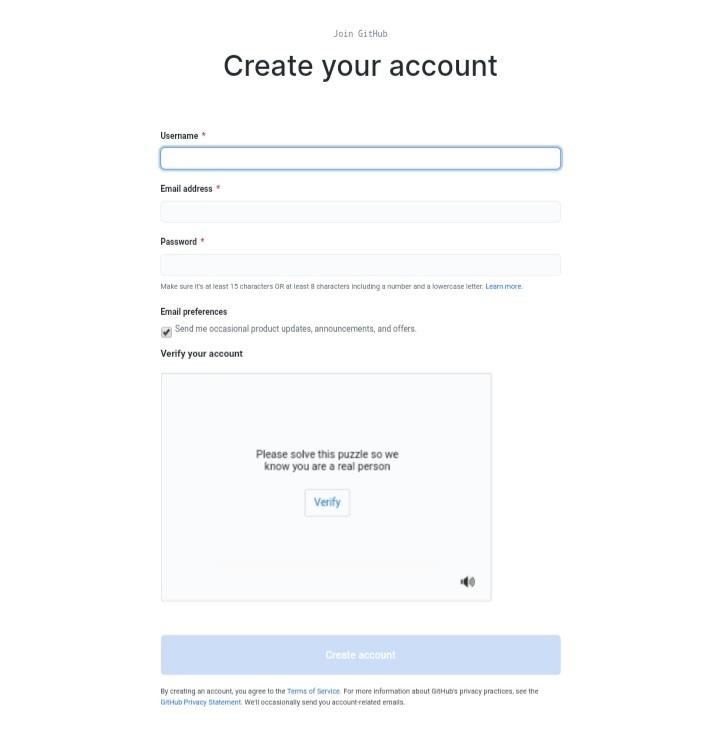
The installation process is complete by signing up for an account. However, if you plan to use GitHub on your local computer, you need to install Git. This can be done by either downloading Git and installing it using your package manager. We will do this using CLI.
Here are the steps to follow:
1. Update the packages:
sudo apt update
2. Start the installation process of Git and GitHub using apt-get:
sudo apt-get install git
3. Verify that the installation is complete and correct:
git –version
4. Enter the commands below with details of your username and email ID to indicate where your work will be saved. Make sure the email ID you use is the same that you entered while creating your account on GitHub:
git config –global user.name “<Your name here>”
git config –global user.email “xyz_abc@mail.com”
You have successfully installed Git and can access GitHub from your computer.
Step 2: Getting started on GitHub
Now that you have completed the installation process, let’s create a new repository.
A repository is typically where you store your project. You can either store it on your computer or GitHub. You can also store it on a third online storage host. A repository can store text, image, or another multimedia format.
Here are the steps to follow to create a repository:
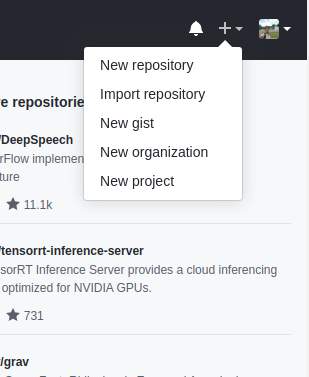
Case 1: Creating a new repository using GitHub
1. Open the GitHub website and click on the “+” sign. Select New Repository from the drop-down menu.
- Name the repository, and add a description (optional).
- Tick the box that says Initialize this repository with a README, and press on the green Create repository button.
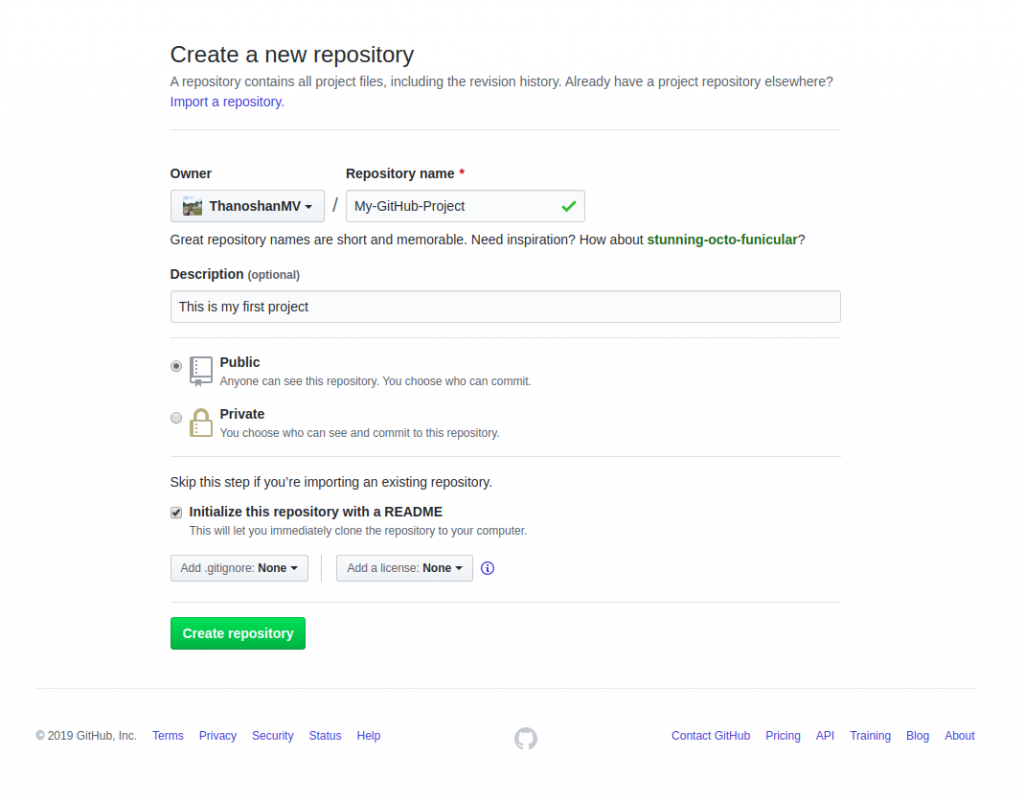
Your repository is successfully created!
The three ‘trees’ in your repository indicate:
- Working directory.
- Index or staging area.
- Head.
A GitHub repository is set to public by default, meaning anyone can view it.
1. The next step is to clone your repository to your computer. This will create a copy of your repository on your local computer. To do so, go to the repository page, and copy the “HTTPS” address.
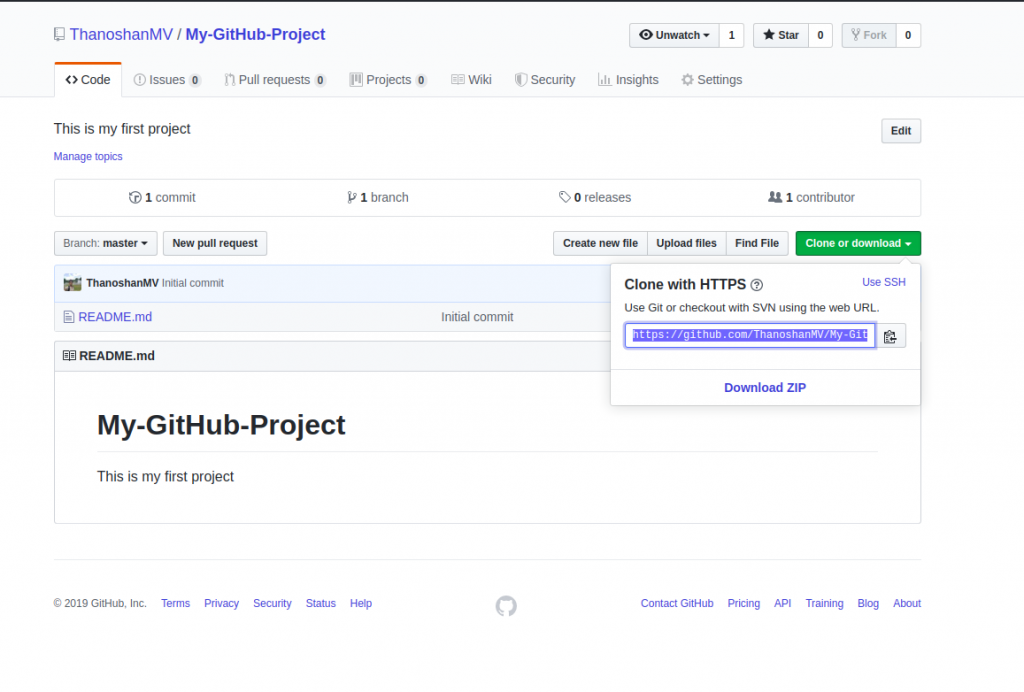
2. Open your terminal and enter the following command. It will create a copy of the host address repository:
git clone [HTTPS ADDRESS]
3. Once your repository is copied to your computer, you can move it accordingly by entering the following command: This will take you to the specific directory where your repository is located:
cd [NAME OF REPOSITORY]
You can also access your repository by locating it on the computer user interface. However, to ensure it is saved on GitHub, we use the Commit operation (which we will discuss ahead).
NOTE: You might encounter an error with Git commands which will direct you to a CLI based text-editor. In this case, simply entering “:q” will help you shut it down.
Now that you have arrived at your repository directory, there are four steps to follow:
1. “status”: Verify the files that have been modified. Typing the following command will display the list of changes made:
git status
2. “add”: Use the following command to upload the file consisting of the changes:
git add [FILENAME] [FILENAME] […]
For example, we are adding an HTML file below:
git add sample.html
3. “commit”: To disclose the changes made, we will add a small description for users. This also helps to keep track of the changes so make sure your message is concise and explanatory. For example, to show that we added a sample HTML file, here’s how we will use the commit command:
git commit -m “Included a sample HTML file that contains basic syntax”
4. “push”: Now, we must create a duplicate instance for our file on a remote server using the ‘push’ command. To use the push command, we need the name of the remote server. If you don’t know the name, this is how you can check:
git remote
![]()
The remote server’s name is usually named origin, as is evident in the image above. Now, that we have our name, we can push our files to the origin. Use the following command:
git push origin master
Visit your repository on GitHub and you will find the sample.html file added to the remote.
Case 2: Creating a new repository using the project directory
You can also create a new repository using your project directory. The procedure includes working on your local computer, creating the repository on GitHub, and pushing it to the remote.
(Push refers to sending a file to GitHub while Pull refers to receiving from GitHub.)
1. To create a new repository using the project directory, we will first ensure that we are in the right directory on our terminal. Alson since a directory doesn’t by default indicate a Git repository, we will convert it into one using the following command:
git init
2. Now we will check which files we have:
git status
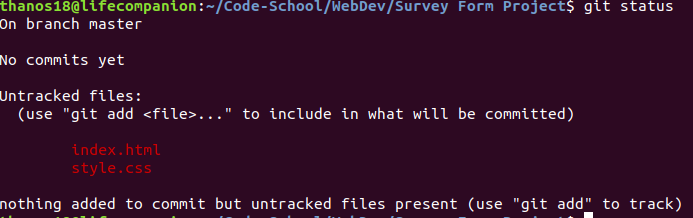
3. The image shows we have two files we can “add” to the repository. Use the following command:
git add [FILENAME] [FILENAME] […]
We can “add” all files using the add command:
git add
4. Once the add command is executed, verify that the files are indeed added:
git status
If the files appear in green, the add process was a success.
1. Now, we will add a small description to indicate changes made. We will use the commit command:
git commit -m “Adding web Survey form”
2. Now, we need to add a remote. To do so, visit GitHub, create a new repository as explained above, and store it with a name of your choice. Press the Create repository button.
- Note down the HTTPS address.
- Create a remote for your repository using the following command:
git remote add origin [HTTPS ADDRESS]
3. Verify if the remote is added or not using the following command. If the output is “origin,” the remote was successfully added:
git remote
4. Use the push command to send the project to GitHub:
git push origin master
Also Read: Top AI Projects in GitHub
GitHub Operations
1. Commit Command
Using the Commit Command, you can save any changes you made to your file. Every time you commit a file, it is recommended that you add a message or description highlighting the changes you made to your repository. It serves as a history that helps keep track of the various iterations of your file. It also ensures transparency with other developers or programmers in case they return to view your repository after you’ve made a commit.
Here are the steps involved in writing a commit using the Commit Command:
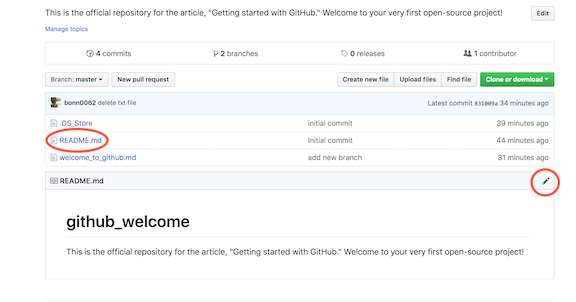
- Go to your repository.
- Open the “readme- changes” file created by you.
- You will find an “edit” button or a pencil icon on the right corner of the file. Click on it.
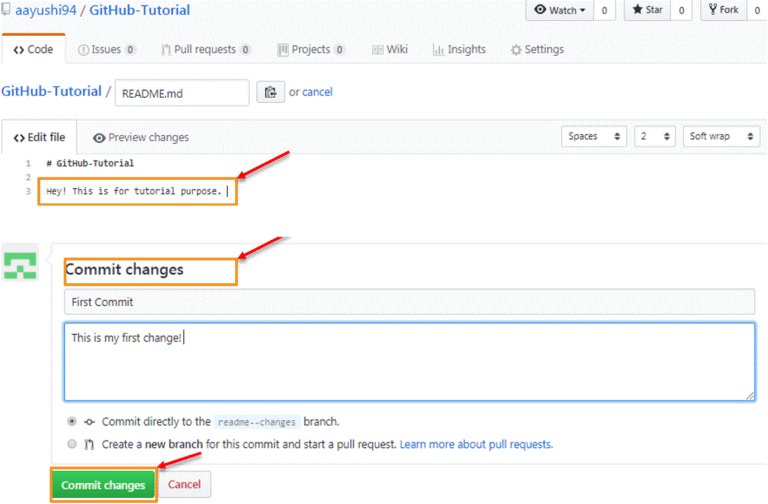
- You will be directed to an editor where you can make the required changes to your file.
- Add a commit message to highlight the changes you’ve made.
- Click Commit changes to save the file.
Making changes to your file is also possible through files/notebooks on your computer.
Next, let us understand the pull command.
2. Pull Command
Pull Command informs GitHub contributors of the changes made to a file and allows them to view or merge them with the master file. Now that the commit command is complete, contributors can pull the file, and when they have finished using it, the file can be merged. We use the Pull command to draw a comparison of the files after changes are made. It also allows you to solve any conflicts manually.
Here are the steps to follow to execute the Pull command on GitHub:
- Open the Pull requests tab.
- Press on New pull request.
- Open the file readme- changes to view any changes in the two files stored in the repository.
- Press on Create pulls request to “discuss and review the changes in this comparison with others.”
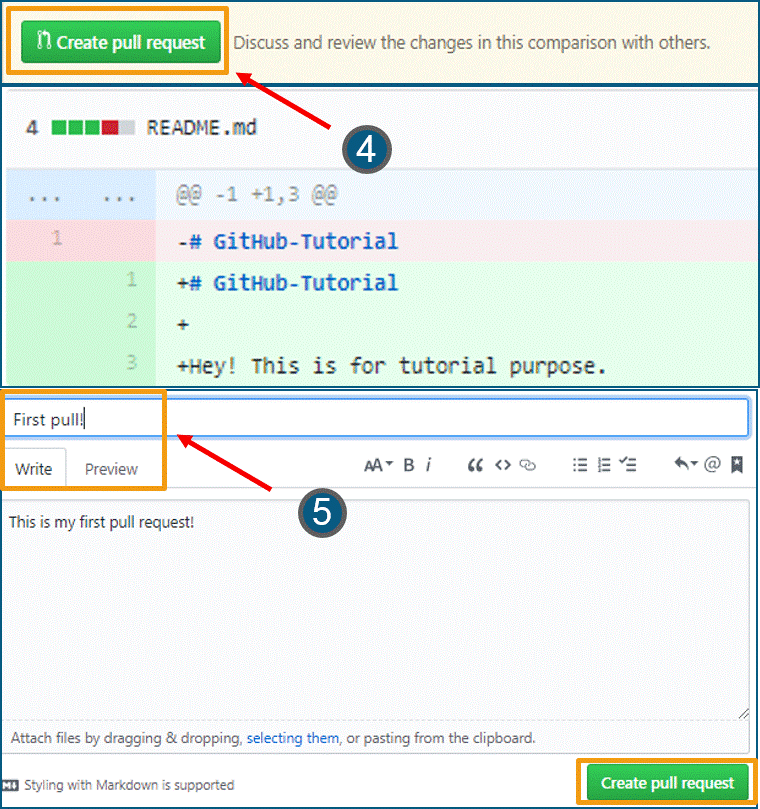
- Add a title and a small description highlighting the changes made and press Create pull request.
Now, we will understand how we can merge this pull request.
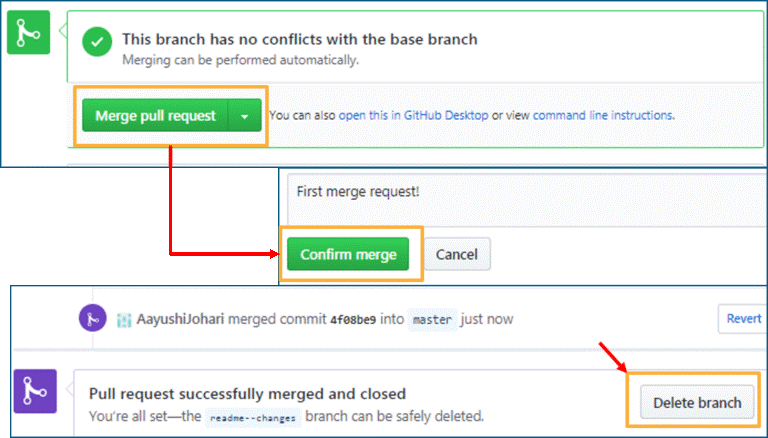
3. Merge Command
The merge command is used to merge the pull request into the master branch. This is indicated in the master branch/ read-me.
Here are the steps to merge your pull request.
- Press on the Merge pull request.
- Press on Confirm Merge when prompted.
- If there are conflicts, you can resolve them manually. In case of no conflicts, you can delete the branch after merging into the master branch.
Cloning and Forking GitHub Repositories
Cloning refers to creating a duplicate file or a copy of a GitHub repository to use for your personal needs.
Forking, on the other hand, allows you to access code from your public repository. Any changes you make in the original repository will reflect in the forked repository. However, the vice versa of this is not true. If you want the changes to reflect, you will need to make a pull request.
Here are a few other helpful commands for GitHub:
1. To look up commands to run:
git help
2. To look up the most common commands:
git help clone
3. To view the commit history of a repository
git log
4. To view a developer’s commits
git log –author=<name>
5. To view changes that aren’t yet staged or added:
git diff
Related: GitHub Open Source Projects
Benefits of GitHub
- You can serve as a contributor to open-source projects. This can be done using the fork and pull request command.
- GitHub supports integration with Amazon, Code Climate, Google Cloud, etc.
- As a contributor, you get excellent feedback which you can use to create documentation for users.
- It allows multiple developers to work on a real-life project where the tasks are defined individually.
- It provides an excellent track of revisions for developers to review changes.
- GitHub is an effective showcasing platform for your skills which can help you attract job opportunities.
Popular AI and ML Blogs & Free Courses
Conclusion
This brings us to the end of the article. The operations highlight how Github works, and what its features are. We hope you now know how to use Git and GitHub.
If you are curious to master Machine learning and AI, boost your career with an advanced course of Machine Learning and AI with IIIT-B & Liverpool John Moores University.


![Artificial Intelligence Salary in India [For Beginners & Experienced] in 2024](/__khugblog-next/image/?url=https%3A%2F%2Fd14b9ctw0m6fid.cloudfront.net%2Fugblog%2Fwp-content%2Fuploads%2F2019%2F11%2F06-banner.png&w=3840&q=75)
![24 Exciting IoT Project Ideas & Topics For Beginners 2024 [Latest]](/__khugblog-next/image/?url=https%3A%2F%2Fd14b9ctw0m6fid.cloudfront.net%2Fugblog%2Fwp-content%2Fuploads%2F2020%2F04%2F280.png&w=3840&q=75)
![Natural Language Processing (NLP) Projects & Topics For Beginners [2023]](/__khugblog-next/image/?url=https%3A%2F%2Fd14b9ctw0m6fid.cloudfront.net%2Fugblog%2Fwp-content%2Fuploads%2F2020%2F05%2F513.png&w=3840&q=75)
![45+ Interesting Machine Learning Project Ideas For Beginners [2024]](/__khugblog-next/image/?url=https%3A%2F%2Fd14b9ctw0m6fid.cloudfront.net%2Fugblog%2Fwp-content%2Fuploads%2F2019%2F07%2FBlog_FI_Machine_Learning_Project_Ideas.png&w=3840&q=75)

